Tomb
Raider Chronicles Walkthrough and Game Guide
Featuring All Secrets and Hidden Rewards and packed with Screenshots
Level 13: Red Alert!
(*Counting only once the HK Clip in the room with the first Android.)
|
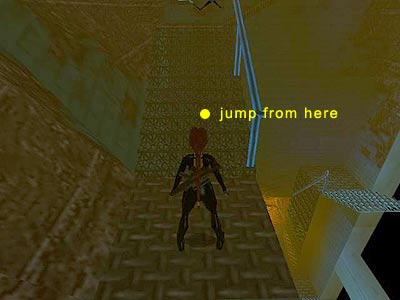
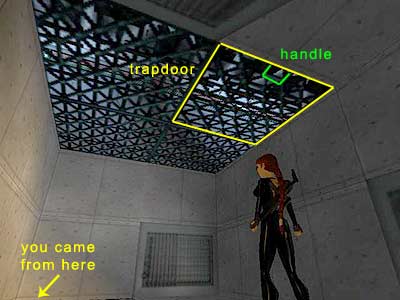
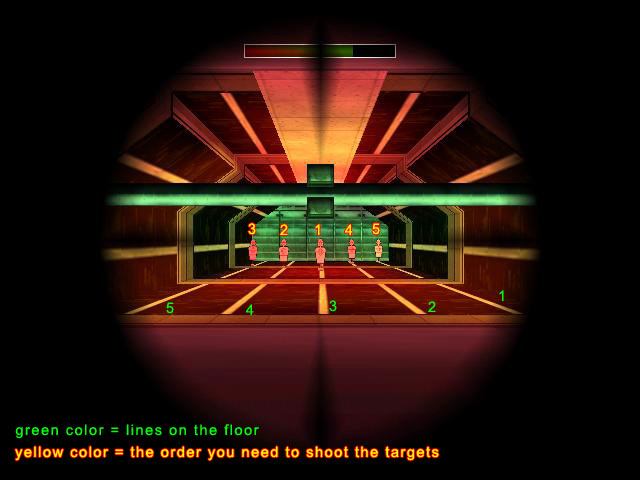
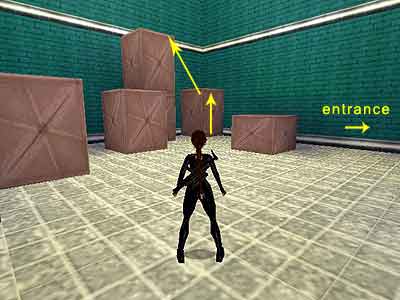
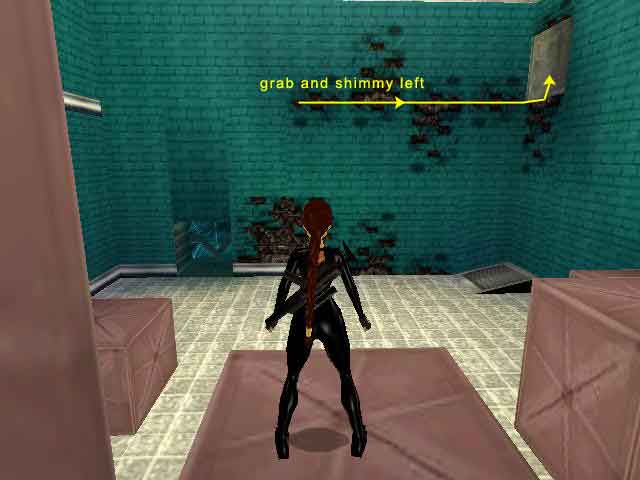
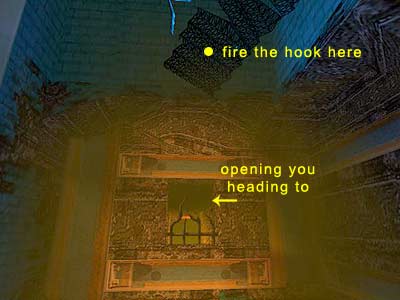
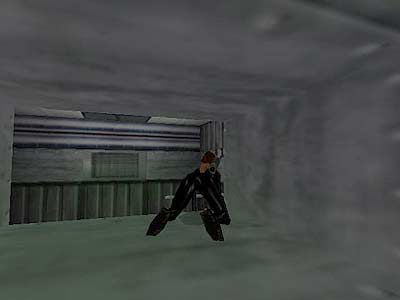
[Note - You may want to take a look at the Note at the beginning of the 13th Floor level, regarding your Gun, ammo and Medipacks. Also, make sure you save in a different slot each time you save, in case you activate a bug, and we assure you there are plenty of them in this level. Saving in a different slot, will help you to load a previous save and try again.] The brief cut scene shows a helicopter surrounding the VCI building firing rockets. Fire escape stairs - You begin the level standing on the fire escape stairs. Do not move at all, and use the Look button to see the armored guard above and on the right. So, as long as you do not move, he will not notice you. Equip your gun and shoot his face. He falls down and breaks the nearby railing. If you try to go down from here, the stairs will collapse and you will fall to your death. So, go up until you reach the ledge the guard was standing on. Turn right and take a running jump to grab the opposite ledge. Pull up and continue up and to the right. When you reach the next platform, you can see and hear the blasts from the helicopter. Again, continue up and to the right. Halfway through doing this, the stairs will collapse. Immediately press Action to grab the closest edge. 1st Secret (1-3\ total: 34-36) - Climb up (or down if you grabbed the stairs quickly) and enter the alcove on the left. Pick up the Golden Rose. The fire cannot hurt you here. With this in mind, stand next to it, take a diagonal standing jump to grab the stairs, and climb to the top. If you cannot grab the stairs, drop down and make your way up again. When you reach the top you will see and hear another blast from the helicopter (who is that guy who screams?). Go up the short stairs and jump to the next platform. Turn right, take a running jump to grab the opposite ledge, and pull up. The next stairs collapse when you get close to them, and Lara seems unable to grab the ledge. So, start running. Jump when halfway towards them. Do not be afraid of the fire because, like the previous one, it cannot hurt you. Or, walk to that same halfway point and take a standing jump. (The point where you need to jump is shown in this screenshot.) Room with grating above - You should now be able to see a cracked wall. Stand in front of it and press Action to kick it. Crawl through the opening and then to the left and around the corner. When you are able to stand upright in the next room, you will realize that the Look button has become temporarily disabled. Take some steps forward to have a better view of the room. You will see some grates in the ceiling and a guard patrolling above. It is difficult to locate it, but one of the grates is a trapdoor. Go to the right hand side of the room. In order to open the trapdoor, do not stand under the grate. The handle is on the far side of the trapdoor (this screenshot shows the trapdoor and its handle) . Wait for the guard to leave before jumping up and pressing Action to grab the handle and open the trapdoor. Equip your gun and make sure you have set it to Burst mode and selected the Automatic targeting from the game's options. This is because you left and got it again in the previous level. During that time when you did not have it, the game will have inexplicably returned it to its default setting. Shoot the guard when Lara aims at him. There is also a possibility the guard will fall down through the trapdoor. Once you are done with him, climb through the trapdoor. Lara can climb up only via the wall, and you need to jump up in order to grab the edge. Laser hallway - Go to the right of the hallway towards the crates. Zip tells Lara to use the infra-red on her shades. Before crossing the hallway on the right, get the Grappling Gun ammo from the lowest crate and the HK Clips from the highest one. Now you are ready for the next part. Take Zip's advice and use your headset. Press Action to activate the infra-red so you can see the moving lasers. Notice the valve at the far left corner of the hallway. Equip your HK gun, and using the Sniper mode, aim for this valve and shoot it. Doing so releases steam that helps you to see the lasers better. Approach the hallway and stand on the right hand side. To get past the lasers, pay close attention to their patterns. All of them have the same one, more or less; they go on, off, on, and then stay off for a longer period than usual. This is the best time to get past each set of moving lasers. There is just enough space for you to stand in between any two set of lasers, but if you are having problems landing, keep an extra eye on the white lines on the floor. This is where each set of lasers appears. Once you make it across, get the Large Medipack from the topmost crate on the left and head to the other side of the hallway. The elevator doors open as you approach them. There is a guard inside, so take him out using either the Burst mode or by using the scope to shoot his head when in Sniper mode. Press the button inside the elevator (logically, you go down). The doors open from the other side and you trigger a guard when you step on the last block before the exit. Stand on the left of the last block of the elevator and wait for him to sneak around the corner. Then, take him out using either the Burst mode or by using the scope to shoot his head when in Sniper mode again. You should be able to see two glass doors opposite the elevator. Both include shooting ranges, but the right hand door does not open yet. So, go through the left hand one and get the HK Clips from the shelf. Depending on how you will do here, you may get the second Secret. If you are not interested just press the button and take your time shooting the five targets. Even if they stop moving at any point, shoot the rest and you will be done here. Exit to the hallway, go to the other side, and follow the Common Route below. First shooting range - If you are interested in the Secret, you need to shoot the five targets before they pass the thick line on the floor close to the window. If you make it on time you will open the second glass door. So, you may want to save your game before pressing the button because you only have one chance to make it. The order you need to shoot each target in depends on which is closest to you. Numbering the targets from right to left (and according to our version of the game), you need to shoot them in this order : 3, 2, 1, 4, 5. (which is central, left, far left, right, far right - this screenshot may help you). In some other versions though, you need to shoot them in the following order: 3, 2, 4, 1, 5 (which is central, left, right, far left, far right). Lastly, make sure you use the Sniper mode here so you do not use up too much ammo. Second shooting range - If you make it on time the second glass door will open. Save your game before going through it because it locks behind you, and you will not be able to get out until you make it. Get the HK Clips from the shelf and take a really deep breath, because the next part is extremely difficult. Once you press the button, poisonous gas begins to filter into the room. There are ten targets you need to shoot before they pass the thick line in the middle of the floor, and each one slides in your direction on one of the five lines perpendicular to you. Because they are divided into four sets (again, according to our version) and they do not all pop up together, we number the lines instead of the targets. So, from the left to right we have 5 lines. The following sequence is shown in this page. Take a look, because it may help you. The first set has three targets that pop up one at a time (you may have trouble shooting these ones in Sniper mode. In such a case, use the Burst mode). Shoot them in the order: 3, 2, 5 (which means central, left, far right). If you shoot them before they pass the middle line, the second set appears which includes two targets that pop up together. Shoot them in the order: 4, 1 (which means right, far left). If you shoot them before they pass the middle line, the third set appears which also includes two targets that pop up together. Shoot them in the order: 1, 5 (which means far left, far right). If you shoot them before they pass the middle line, the last set appears which includes three targets that pop up together. Shoot them in the order: 3, 2, 4 (which means central, left, right). If after shooting each set you do not see the next one, it means that you did it wrong and that you did not shoot each set before it passed the middle line. Guess what! You need to load a previous save or you will die from the gas. 2nd Secret (2-3\ total: 35-36) - If you successfully made it through the two shooting ranges, you would have unlocked the door that leads to the Secret. Go to the other side of the hallway and through the left hand door (the one you just successfully unlocked). Pick up the HK Clips and the Golden Rose from the middle of the room. Do not try to get a gun from the armory because the lasers will kill you. Exit to the hallway. Common Route - The other glass door (on the right of the hallway) is open now. Go through it and pick up the HK Clips from the floor. Approach the armory with the green lasers and get the Grappling Gun. As soon as you get it, a guard enters the room. Kill him and get the Grappling Gun ammo from the shelf in the far left corner of the room. The door nearby opens when you approach it. Storeroom with crates - Enter the storeroom. A guard appears from behind the crates. If you want you can kill him using the scope (in Sniper mode), because he comes out sneakily, and you have some seconds to spare before he begins to shoot at you. Although his face is covered, you can still kill him by shooting him in the head. Climb onto the box in the far right corner of the room and take a standing jump to grab the edge of the topmost one (as shown here). Pull up and collect the HK Clips. Drop onto the lower crate and equip the Grappling Gun. Use the scope to aim at the grate in the middle of the ceiling and shoot a grappling hook to reveal a rope. Walk to the edge of the crate and take a standing jump to grab the rope. Swing towards the wall with the black textures on it, on the right of the entrance. It is supposed to be a crevice (see here to get oriented). Jump, pressing Action shortly afterwards in order to grab the wall. In the aftermath, shimmy to the right and around the corner. Hoist yourself up into the duct. Back to the hallway - Before dropping through the hole you may want to equip your gun, because two armored guards that fire bolts are coming at you from the other side. Seeing how the only sensitive part is their head, set your gun to Sniper mode and be ready to shoot them. Slide down and use your scope immediately as you enter, because the guards are already coming towards you by this juncture. Shoot their heads (one shot for each one is enough) and head to the other side of the hallway. On your way back to the fire escape stairs - Enter the elevator again and press the button to return to the previous floor. There is another guard waiting for you at the end of the hallway where the crates are, and he is standing behind the corner on the right. Equip your gun and set it to Sniper mode. Stick to the left hand wall and start taking steps forward, being sure at the same time to use the scope after each step. Eventually you will see his head behind the corner; shoot him. You need to pass the lasers again like you did before. Once you make it, drop through the trapdoor and crawl back to the fire escape stairs. Back to the fire escape stairs - Notice the destroyed stairs above. Equip your Grappling Gun and aim at the lowest part of the stairs. You should be able to see a green target if you aim at the correct spot. You will not be able to fire a hook if you aim a wrong spot, though. You need to grab the rope and swing towards the opening on the other side, where half of the railings are missing. (In this screenshot you can see where you need to fire the hook and the opening you are heading to.) So, stand at the edge of the stairs and position Lara so she is facing this opening. Then line up the rope, using the Look button. Grab it and swing towards the opening, eventually releasing your grip and sliding down the slope beyond. Jump when you are almost near at the end of this slope to avoid the fire, and grab the ledge ahead (this fire IS harmful). Storeroom with crates, guard and gun turret - Crawl through the opening and follow the duct to the end. You will be able to hear a guard patrolling below. If you want to see him, press the Draw Weapon key to kneel and use the Look button. Also, make a mental note of the dark part of the ceiling. If the guard notices you, he will press the button at the bottom and activate the gun turret. This will take a lot of your health, so move carefully. Position Lara at the right hand corner of the duct and turn her a bit to the right (45 degrees, as shown in this screenshot). There is a crate you can somersault onto courtesy of pressing the Jump button. From there you can kill the guard by shooting his head. If you cannot aim at his head from this crate, you can take a standing jump to the crate in the left hand corner of room. Once you are done with him, drop down, pick up the Large Medipack, and throw the switch to open the door (do NOT press the button or you will activate the gun turret yourself!). Exit to the hallway and go to the right. Press the arrow buttons to call the elevator, and press the buttons inside to take a ride. The doors open automatically as you approach them. (Bug note - You may not able to get out of the elevator because the doors will not open. In such a case you will need to load a previous saved game, one that takes you back to where you were BEFORE entering the storeroom with the crates, the guard, and the gun turret. If possible, try to complete this entire segment without saving and loading at all. You will have more chance of avoiding the bug.) Lounge with helipad exit - When you step out of the elevator, two commando's slide down on ropes bearing malicious intent. If you do not want to lose a lot of your health here, first stick to the left hand wall of the elevator and step out to trigger the two commando's. Then, immediately jump backwards TWICE to enter the elevator again. By doing this you keep a good distance away from the right hand commando, and sticking to the left you hide from the left commando. The latter cannot hurt you until you kill the right one. Use the scope and kill the right commando, shooting him about four times. The left one will approach more carefully, so you have plenty of time to aim at his head and kill him. (Bug note - If you successfully opened the doors of the elevator and saved before exiting, loading this specific save will cause the commando's to not show up. This is partly good BUT you will remain stuck in this room because you badly need the one rope in order to proceed with the level. In that case, you need to load a previous save, and DO NOT save and load before exiting the elevator.) There is a closed door that leads to the helipad, but you need to insert a key in the receptacle to open it. If you are lucky and have not activated a bug, standing underneath the left hand rope will make Lara focus on the metal doors above the stacked crates. This is not essential for the game, but it will mean that you need to reach those metal doors using this specific rope. Stand on the upper step having the receptacle to the back of you. Walk to the edge of the step and use the Look button to aim for the rope. Tap back once and take a running jump to grab the rope. Alternatively, you can climb on the block where the plant is and grab the rope from there. Swing towards the crates and jump from the rope to land directly on them. Stand in the middle of the crate and jump up to grab the handles and open the metal doors. Two more guards appear, one directly above the metal doors and one below them next to the closed helipad door. Immediately roll so that your back will stick to the wall beneath the metal doors. The guard above cannot hurt you, and you can kill the guard below without having two guards shooting at you at the same time. Once you are done with him, turn around, take one step backwards, and take care of the second guard above. (Bug note - If you saved your game after killing the two previous guards that slid down the ropes, and loaded this specific save, you will not be able to grab the handles and open the metal doors. In that case, the last pair of guards will not appear. However, according to many people, you can climb through the metal doors. Just stand against the wall beneath the doors and press Up and Action together. If this does not work for you, you will need to load a previous save before killing the guards that slid down the ropes. This bug though, will not affect the rest of the game in any way.) Follow the duct to the end. Save your game HERE. This will be your "cleanest" saved game. You need to complete the next part very carefully. It sounds tough, but it is your only chance to complete the game. When you step in front of the button, the trapdoor below opens and you slide down. Turn around, but before dropping through the hole, look for the ladder ahead. If you manage to survive (from the guards and the bugs) this will be your way out. Now drop through the hole. (Serious bug warning - You may encounter some serious bugs in this final part of the level. We STRONGLY recommend you save in a different slot because the next part is quite difficult and you may need to load up a saved game in case you do not fare very well. Most of the areas are bug sensitive, and you may activate one by mistake. Saving in different slots however may help you to complete the game. Alternatively, we have displayed some advises below on how you can get rid of a bug just in case you do not have a previous "clean" saved game. Note that this advises may not cover all the bugs.) On your way for the exit key - Continue ahead to reach a small room with three more doorways: Caution on the left, Dangerous ahead, and Helipad on the right. Seeing how the first two are blocked by lasers, follow the Helipad doorway. At the t-junction, the left hand way is blocked by lasers, and beyond this the long hallway you should be able to see some yellow fuel tanks. On the right is a crawlspace. [Bug note - If you cannot see the fuel tanks it means you activated a bug by saving your game after sliding down and loading this specific saved game. To reset the area, backtrack to where you slid, jump towards the slope to slide again, and return to the t-junction. Now you should be able to see the yellow fuel tanks. If not, you may continue with the game because not seeing them has ever prevented us from finish the game. Also, according to the normal way of things, the lasers are deactivated AFTER you kill the first Android. If you try to kill him but cannot, and decide to return back and the lasers are deactivated, DO NOT proceed. DO NOT leave the area until you kill the first Android.] Destroying the first Android - Crawl through the opening on the right and climb up the ladder. The grate ahead opens as you approach it. You will hear someone patrolling below. If you want to take a look at what is going on in this room, quickly walk to the edge of the duct. Normally, the camera will show Lara from inside the room. You may not trigger this camera, but it is not a big deal if you do not. You can see the Android below, a Large Medipack on the floor, and some HK Clips on the pink crate below and to the right. Immediately jump backwards. Briefly, the deal here is to destroy the Android and collect his Key Bit. In order to do that you need to flood the room and electrocute the Android. Then you need to dry the room again, pick up the Key and leave. There are two ways to destroy the Android. (Bug note - The room MUST be dry when you first reach this area. If it is flooded, you have activated a bug by loading a saved game after sliding down. To reset the area, backtrack to where you slid, jump towards the slope to slide again, and return to the duct. The room should be dry now.) First way - Jump to the pink crate (or roll, which saves some time. You could even just run off the corner). If you do not have much ammo, pick up the unlimited HK Clips, which means that new clips appear every time you run out of ammo. Turn around, and having set your gun in Sniper mode, shoot the red valve located below and a little to the right of the duct. The camera will show water bursting out of the pipe and flooding the room. This also opens the vent in the upper part of the room opposite the duct. (Bug note - If you cannot see the red valve, or the vent does not open, you need to reset the area. See the Bug note above.) Once you have shot the valve, take one step backwards and perform a standing jump to enter the duct again. Turning around after dropping onto the crate in order to aim at the valve, you should also face the duct. Thus, from here the standing jump will lead you back inside the duct. You can save your game here, but make sure you use a different slot. You can also kill the Android from here. Walk to the edge of the duct, and having set your gun in Sniper mode (or Burst if you have lots of ammo), use your scope to shoot the Android every time you see it passing below you. When you see him looking up at you, tap back once to avoid being hit by him. Walk to the edge again and do the same thing. Eventually you will see his mechanical part being revealed. Finally, you will see his mechanical arm and leg. After this you will only need a few more shots in order to electrocute him fully. In the case that you do not mind spending a couple of Medipacks, you can stay on the crate and shood the Andriod from there. Second way - Instead of dropping onto the crate, stay in the duct and start shooting the Android as described above. When you see his mechanical left arm and leg be shown, drop onto the crate, get the HK Clips if you need them, and turn around to shoot the red valve. If he has not been electrocuted by the water already, he will need a few more shots. You can do it either by staying on the crate or jumping into the duct (depending on how much health you want to spend). Once you destroy the Android, you may want to save your game. Again, we recommend you to use a different slot. Now, do not step into the water or you will be electrocuted. Regardless of which strategy you followed to destroy the Android, drop onto the pink crate. From there you need to jump to the black metal ledge next to the duct. To do that, stand at the back right corner of the crate (assuming the duct is on your left) and take a running jump WITHOUT pressing Action or Lara will not make it. You may have to swing her left whilst in midair (this screenshot shows the procedure). Alternatively, you can use another way: jumping from "duct to duct" via the two located opposite the crate. If you want to do that, take a running jump from the crate and towards the sloped duct on the right. Hold down the Jump button without pressing any direction keys, and Lara will do a series of jumps from duct to duct, eventually landing on a flat ledge near the metal grate. Pick up the Grappling Gun ammo from the black metal ledge and climb onto the duct on the left. Equip the Grappling Gun and aim for the grate in the middle of the ceiling. Shoot a hook to reveal a rope. Walk to the edge of the duct, and using the Look button, aim for the rope. Take one step backwards and then do a standing jump to grab the rope. Swing towards the opening and jump from the rope to grab the edge. Pull up and throw the switch at the end to drain the room below and close the gate of the duct you came through. (Bug note - DO NOT save your game after using the switch. If you load this save, the room will be flooded and you will not be able to get the Key Bit from the Android. In such a scenario, throw the switch again, and if this does not work, load a previous saved game. You cannot reset the area now because in throwing the switch you closed the gate back to the duct.) Do not drop to the floor because it is too far down. Instead, take a running jump to grab the rope and jump also to the duct. A second set of Grappling Gun ammo has magically appeared now on the black ledge. Pick it up and drop to the ground. Collect the Left Key Bit from the dead body of the Android and the Large Medipack from nearby. Now you need to make your way up again and use the switch a second time to open the gate of the duct. Do not forget that you also flood the room in doing this and Lara must not step in the water. You know how to reach the switch. Once you have used it, take a running jump to grab the rope and then jump onto the duct. To leave, hang from the edge of the duct, release Action, then press it again straight afterwards to grab the lower ledge; pull up. Or, jump onto the crate and from there into the duct. Climb down the ladder and crawl back to the t-junction. Long hallway with helicopter - The lasers are now deactivated. On the left you can see a passageway - this is where you need to trap the second Android and get his Key Bit. You may or may not be able to see some yellow fuel tanks in the hallway ahead. It depends on whether or not you have activated a bug. Normally you will be able to see those fuel tanks and the floor would be solid. If you have activated the bug, though, you will not be able to see the fuel tanks and the floor will not be solid. Instead, you will see pits on the floor. What is the deal with the fuel tanks? When you try to cross the hallway, a helicopter from the right will start shooting at you, and therefore the fuel tanks will come into their natural firing line. If hit they will explode, creating large fallout holes in the floor as you go (sprint whilst running on the decrepit floor to avoid falling down). This can damage you, or may make you catch fire. Also, do not shoot the tanks before you start running, as this will create fire where the tanks were. If you have activated the bug, you will not be able to see the tanks but the pits will be on the floor. In that case you need to carefully jump over the pits on your way, being careful not to fall in any of them. It is not a big deal if you fall into one from an immediate survival point of view, but you need to be careful when you try to climb out because the helicopter will get a good sighting of you. You can reset the area if you want by backtracking to where you slid, jumping towards the slope to slide again, and returning to the t-junction. However, as far as we know, this bug does not prevent you from finishing the game. [Note - If you want, you can save your game before attempting to pass the hallway. The only bug you can activate by loading this save is to wipe away the fuel tanks, but their absence cannot prevent you from finishing the game. We then recommend you complete the next part (trap the Android) without saving and loading at all, although there is a "safe" spot you can save in that works for most PC players. Also, there are two Large Medipacks in the pits. Get them only if you need them very badly, because with one wrong move you can die at the hands of the helicopter. If you desperately need them, do it now or you will not have another chance later on (as the Android will make sure you do not), and getting the Medipacks at the end of the game is useless anyway. Check at the bottom of the page as to how you can get them.] Get past the helicopter - If you have not activated the bug or you have reset the area, sprint through the fuel tanks. If you sprint you will be ahead of the helicopter and therefore the explosions as well. If you activated the bug, and you cannot see the fuel tanks but you can see the pits, just run as you would normally on the left hand side of the hallway and jump over the pits. Clear the first two pits by taking running jumps: jump to the edge of the first pit and jump just before the edge of the second to give Lara enough space to get over the third one. For the fourth, take a standing jump. (Some people have mentioned that they cannot see the fuel tanks, but there are fires between the first and second pit. To clear the first pit, run in the precise direction of middle right and jump before the edge to give Lara enough space to leap over the second pit and grab the opposite ledge. You then need to pull up and take a running jump over the third pit. For the fourth, take a standing jump.) After getting past the helicopter - Phew! Take a breath, but do not save yet (or do it in a different slot). Get to the next doorway but do not go past it yet. Use the Look button to take a look inside. This place seems quiet, but not for too long. As soon as you step into the lounge, the helicopter will start shooting at you again from the right. There is a button in the far left corner of the room behind the bar. What makes the situation difficult is the fact that not only is the Look button disabled, but the camera shows you moving. Enter the lounge and head to the left where there is no bar. When you pass it, go to the right and Crouch behind the right hand bar. Or, running to the left, jump onto the bar, drop down on the other side, and crouch. Crawl to the end where the button is. Here you can stand. If you want you can save your game here, but make sure you do it in a different slot and BEFORE pressing the button. As far as we know, this saved game does not cause a bug. This button, as the camera shows you, opens the Helipad door in the same room you are currently in. Unfortunately, this door malfunctions and you cannot go through it, and because you were a bad girl and tried to open the exit door, a second Android has appeared and is now waiting for you outside the lounge. So, the only exit left for you to try now is the long hallway outside. The Android will follow you, but if you saved your game after pushing the button, you will not have a chance to complete the next part if you fail. Loading this saved game will activate a bug which causes the Android not to follow you. Instead, he falls into the pits. You need to load a previous saved game from BEFORE when you push the button. So, push the button. You will hear Zip talking to Lara. It is quite difficult to hear him because of the noise from the helicopter. He tells her he has found an exit, but then the connection trails off before he can tell you what it is (it found the perfect time to do that!!). Make your way back to the hallway, duck beneath the part where there are no bars, stand, pass the opening, and head to the doorway on the right from whence you came. The Android is in front of you. As before, you can save your game in a different slot before attempting to cross the hallway, but DO NOT save until you trap him. Getting past the helicopter (2nd time)\ Trapping the second Android - After going through the doorway, keep running, and take a running jump before the edge to clear the first pit. Take a standing jump for the second pit and grab the opposite ledge. Pull up and take two more running jumps to clear the next two pits. As you go you will notice that the entrance is again blocked by lasers. This happened because of the button you pushed in the lounge. Enter the passageway on the right and sprint into the hallway. As you go you will be able to see the grate on the floor and a switch underneath it. In the next small room with the window on the right, turn left, then left again, and finally left for a third time in order to reach the switch; stand in front of it. If you made it on time you will be able to look up through the grate. When you see the Android passing over you, entering the room above, throw the switch to lock him inside. Yes! You may want to save your game here. As far as we know, loading this saved game does not activate a bug. Just in case however, save in a different slot. If you did not make it on time, and the Android comes towards you, better load a previous save and try again. If you are standing in front of the switch and the Android just is not coming, then you have activated a bug where the Android has fallen into one of the pits back in the hallway outside. You need to load a previous save under these circumstances. In the event you do not have a "clean" save, there is a possibility you can fix this bug by resetting the area, but given that the part where this can happen is blocked by lasers, you need to do something you would if you had trapped the Android. There are some switches in the next part of the level (Gas Rooms) that deactivate the lasers across the entrance. Throw the switch like you would of if you had already trapped the Android so you can enter the Gas Rooms. Now follow the next part, ignoring what is mentioned about the Android. Gas Rooms - Once you have successfully trapped the Android, go up the ramp and turn left. Because the Helipad doorway and the one you first came through are blocked by lasers, go to the left where the Danger sign is. You enter an area with gas jets. On the upper right of your screen you can see the breath bar, which gradually gets decreased as Lara holds her breath for longer and longer. You also lose some normal health along the way, because Lara accidentally breathes in the gas now and then. If you try to crouch though, you will restore your breath. The Gas Rooms are ahown in this diagram. In the first room you can see a door ahead and a second one on your left. The one on the left does not open (you will unlock it in a short while), so continue ahead. In the second room with the low crate, the only way is left. So, go through the left hand door now to reach the third room. Here you can see a switch ahead, a door on the left that you cannot open, and a crawlspace on the right. 3rd Secret (3-3\ total: 36-36) - Crawl through the opening on the right and get the Golden Rose. Restore your breath and crawl back out. Throw the switch to unlock the door back in the first room. Roll and leave the room from where you came. On your way back, and entering the second room with the low crate, you trigger a guard close to the next door. Kill him. This causes another guard to appear from behind you and next to the crate (some people have mentioned that the second guard does not appear. In that case, just continue on with your business. This bug does not affect the game). Keep going and enter the first room. On your right is the door you unlocked by virtue of throwing the switch beforehand. This door was locked when you first entered this room. Go through it and throw the switch in the next room. This will draft the gas from the room you are in to the room where the Android is. Enjoy the scene through the window that connects these two rooms. When the Android is dead, he leaves his Key Bit. Use the switch to again exchange the gas (otherwise you cannot exit) and roll to leave the room. Exit the Gas Rooms and go right. Again go right to reach the switch you used to trap the Android (if you have reached this part of the walkthrough because you are trying to fix the bug where the Android has fallen into the pits, keep following it). Use the switch again to open the doors. Now that you have used the two switches in the Gas Rooms, you have deactivated the lasers that block the entrance. Go up the ramp, turn right to enter the room where you trapped the Android, and pick up the Right Key Bit that he dropped. Exit via the hallway and immediately sprint to the right to avoid the helicopter. Enter the doorway on your right (just before the crawlspace), follow the left hand doorway which does not have a sign, and climb onto the ledge. (Note - If you have reached this part of the walkthrough because you are trying to fix the bug where the Android has fallen into the pits, go ahead and jump towards the slope to slide again. Now you have reset the area back to the hallway with the helicopter. Return there and you will see the fuel tanks. Shoot them using only your HK gun to blow them up. This will make the Android move again. Immediately run to the left passageway and try to trap him as described above. You need to get past the Gas Rooms again, though.) On your way to the exit - Turn around and jump to grab the ladder. Climb to the top and then left as much as you can. Release to drop onto the duct. If you had not activated the bug before, the metal doors should be open. Otherwise, you can drop through them. You can hear Zip congratulating Lara and he advises her to get out of there. Drop to the floor and head to the receptacle next to the Helipad door. If you have not already done so, combine the Left and Right Key Bits to get the Helipad Access Key and use it in the receptacle. Go through the Helipad door and go up the ramp to end the level and the game. Sit tight and enjoy the FMV where Lara escapes from the VCI building. If you found all 36 Secrets the game had to offer, you can now access the Special Features from the Options of the game after viewing the credits. Getting the Medipacks from the pits - Sprint and stand behind the column in front of the first pit. Take some steps to the left to reach the wall, perform a running jump over the first pit, and run a bit forward to be safe. Drop onto the box on your right and then to the space between the box and the left hand wall. Notice the crawlspace on the left wall? Well, take a standing jump in front of it and immediately crawl through it. Get the Large Medipack and crawl back out. Quickly run behind the box and climb back up to the safe ledge. Take a running jump over the next pit and drop to the box below. Get the Large Medipack from between the box and the column and climb onto the box again. Walk to the edge of the box and take a standing jump to land directly on the next ledge (do not grab). Now take a running jump and quickly run into the room ahead.
|
||
| « Level 12: Escape with the Iris | Index | |
|
Copyright © www.tombraiderchronicles.com |
||