Tomb
Raider Chronicles Walkthrough and Game Guide
Featuring All Secrets and Hidden Rewards and packed with Screenshots
Level 12: Escape with the Iris
(*Including the HK Gun you retrieve at the end of the level, since Lara "picks it up" again.)
|
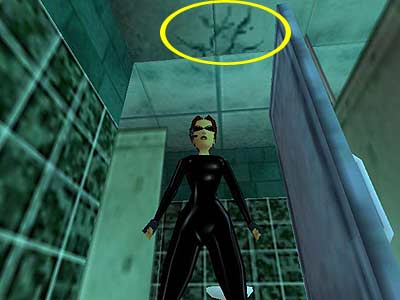
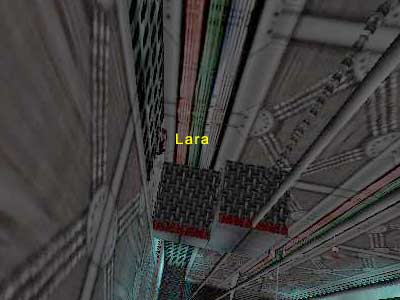
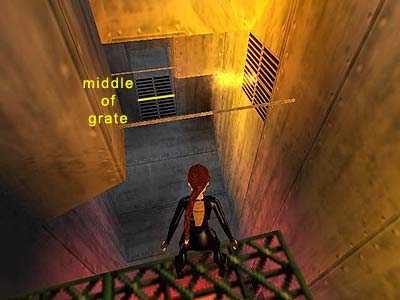
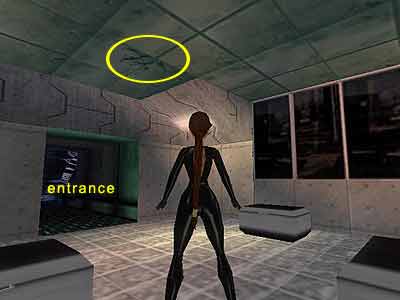
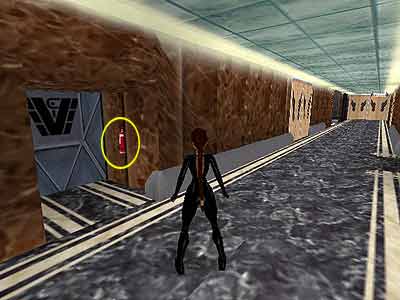
(Note - You may want to take a look at the Note at the beginning of the 13th Floor level, regarding your Gun, ammo and Medipacks. Also, make sure you save in a different slot each time you save, in case you activate a bug, and we assure you there are plenty of them.) Hallway with scanners - Follow the hallway around to the left to reach a small lobby. Zip advices Lara to leave her gun on the tray. Just to let you know, the scanners in the next hallway activate the gun turrets in the lobby where you are now. They will also activate the ones in the lobby beyond the hallway if they detect a metal object (i.e. a gun). So, follow Zip's advice and approach the white tray on the left. In the next brief cut scene, Lara leaves her gun on the tray. Now you can enter the hallway freely. Before crossing the hallway, take a look at the right hand part of the ceiling. There is a hatch you can open (the handle is the scratch), but you will not find anything more than a closed door up there. You will come back here via that way towards the end of the level. Cross the hallway and open the second case that includes a Small Medipack. Do not bother with the first one, as there is a bomb inside (you can see it through the scanners). Continue ahead. Turn right at the T-junction whilst Zip explains to Lara that she needs to get to the roof, avoiding the stairs and the elevator in the process. He also advises her to try and find some guns. Pick up the HK Clips but do not go any further. There are three horizontal invisible lasers ahead. Use the Headset and press Action to activate the infra-red and see them. Head to the other side of the hallway. Just before turning the corner, use the security camera. It will show you a guard on a staircase. This scene is behind the door nearby, but you cannot go there now. So, do not worry about him and continue right and around the corner. Hallways with offices alongside - At the T-junction you can see a keypad on your right, but seeing how you do not have the code for the Restroom yet, go through the door ahead that opens automatically as you approach it. Get the Bottle Of Chloroform from the cabinet and exit to the hallway, again heading to the right straight afterwards. A cut scene shows a guard standing around the corner. For now you can move freely, entering the office on the right. Get the Cloth from the drawers and exit to the hallway. Continue to the right, but you need to be quiet. Making sure you are pressing the Walk button, pass the closed door on your right (you will come here in a minute) and stand behind the guard. Combine the Cloth with the Chloroform and press Action to use the Soaked Cloth. Lara kills the guard using the Chloroform in the next cut scene. Back track to the door you passed before and enter the office. Get the Small Medipack from the drawers and go back to the hallway where the guard was standing. Get a Bottle Of Chloroform from the cabinet of the second office and the Restroom Access Card from the drawers of the third office. Return to the locked Restroom. Restroom - Examine the Access Card you just got to get the code (8526) for the keypad. Stand in front of the keypad and press Action. Use the direction keys to move through the numbers and press Action (or Enter for the PC version) to select the number you want. Once you have pressed four keys, the star on the keypad will be selected automatically. Press Action to confirm the code. Enter the ladies' room on the left. You lose the control of the Look button here, but there is nothing more interesting around than a Large Medipack. Get it from the second cabinet (press Action to kick the door open) and exit. Go to the left and enter the men's room. Again, you lose the control of the Look button. Open the door of the first cabinet and stand at the entrance. The camera shows you a trapdoor above. Jump up to open the trapdoor (the handle is the scratch, as shown here). Then climb into the duct. Crawl to the left, stand at the end, and turn around. Hang from the edge, release Action, and press it again immediately to grab the crevice below. Release and drop down. Crawl to the left to reach the elevator shaft. Elevator shaft - Save your game here. Crouch and position Lara in the middle of the opening. Crawl backwards and hang from the climbable wall. Back flip, pressing Roll to twist in midair, along with Action to grab the chain behind you. You may not make it the first time, and the reason will probably be because you did not hang from the middle of the climbable wall. Just take stock of whether or not Lara went to the left or right of the chain. The mental yardstick will aid you in making a better judgment the second time. It is better if you try to stand in the middle of the opening and then hang from the wall, rather than trying to position Lara whilst hanging from the wall by shimmying left or right. If you cannot do that, climb down the wall to the bottom and release when you see your entire shadow in the floor of the alcove (as shown here). 1st Secret (1-3\ total: 31-36) - Slide down the chain and turn around. To reach the alcove with the Secret, walk to the edge of the platform you are standing on and tap back once. Take a standing jump to land in the alcove. Pick up the Golden Rose and take a standing jump back to the bottom of the chain. If you have climbed all way down the wall above the alcove and landed in it, you can simply step in and take the Secret. Then turn around and jump to the bottom of the chain. Climb up the chain until you see a metal ledge. You will be able to see it if you climb up facing the alcove. Otherwise, you will only see it behind you. Back flip onto it and turn right. Take a running jump to grab the horizontal pole and release Action to land in the alcove on the other side. You need to grab the top of the elevator on your left, but since it is quite tricky, you may want to save your game. Position Lara having the shaft on her left and take steps backwards so that her back is touching the wall of the alcove (the right hand wall as you see in your screen). Take some steps to the left to reach the edge, and turn her to the left so that she faces the elevator (this screenshot shows the correct position). Take a standing jump to grab the edge and pull up. At the top of the elevator - Go to the second elevator and pick up the HK Clips from the far left corner. Return by virtue of standing on the box that has the VCI symbol on it, and facing the first elevator, open the hatch. Drop into the elevator and press the button. The doors open in a little while. Exit carefully, as there is a guard on the right hand side of the hallway. You cannot go to the right as the lasers prevent you, and you cannot use the Chloroform on the guard. So, Walk to the left and press the arrow buttons to open the doors for the next elevator. Press the button inside. The camera shows you riding up and you will soon reach the next floor. There are two guards and another of those armored guys (the ones so prevalent in the previous level) outside. There are two Large Medipacks at the end of the hallway, but nothing more. The armored guy needs only two shots to take you down, and the two guards will keep shooting at you seemingly without ever a need to re-load their weapons. If you are lucky, you will not be hit by the armored guy, and only the two guards will have taken some of your health. Decide here whether or not you want to exit, get the Medipacks, and return back (follow the next three paragraphs). However given that there is nothing essential to pick up in doing this, you can press the button again without exiting at all (skip to the Falling elevator below). Getting the Medipacks - If you desperately need the Medipacks or you just want all the pick-ups, you need to be quick in the next part. If you are careful you will notice that the camera shows the elevator going up from outside, then returns inside it to show you Lara. You can control\ turn\ move Lara whilst all that happens. Take the advantage of this to earn yourself a few extra seconds before the bad guys start shooting at you. Lastly, notice that once the camera is finished with its sweep, Lara will end up facing the elevator doors. So, whilst the camera shows the elevator going up, keep pressing forward to run towards the elevator doors. When the doors open, start sprinting. Sprint past the first shooting guard from the right, and after passing the laser guard, perform a somersault towards the Medipacks (press Jump whilst sprinting and make sure you release Sprint whilst performing the somersault). Stick to the right hand wall and take a running jump to the Medipacks. If everything went well, you should now be standing in front of the right Medipack. Pick it up, turn left, pick up the next one, and turn again left to face the elevator. To return back, take a standing jump, run towards the laser guard, and perform a diving jump over him. Run to the elevator, jumping at the same time. Once you are in the elevator, press the button. You may have lost some health as you did all that, but do not forget that you have collected two Large Medipacks. Also, make sure you do not save or enter your inventory whilst trying to get the Medipacks or you will lose precious seconds. Falling elevator - Once you press the button, the cables are cut off and the elevator falls to ground. Press the button again to activate the brakes or the elevator will crash. If you do it on time you will hear Zip talking to Lara. She tells him she is fine and then Zip says she needs to go up again. Elevator shaft with poles - So, climb through the opening in the ceiling and turn around to reach the edge close to the horizontal pole. Take a standing jump to grab it, release Action, and then press it again to grab the opposite ledge. Now pull up. Turn right and climb up the wall. When you see the grate texture on your left, press Jump to back flip onto a ledge behind you. There is another horizontal pole on your right that you need to grab. Take a running jump to grab it and release Action to land on the opposite ledge. Whilst hanging from the pole, you can see an alcove with Chloroform inside it. You will get this in a little while. Climb through the opening above and on the left, and crawl forward. When you are able to stand, save your game. Room with pit with fire - The next part is quite difficult. Make sure you slide forward, and after dropping onto the second slope, jump from the middle of the grate to grab the horizontal pole (see here for where you need to jump). If you do not make it you will slide into a pit with fires and Lara will be toasted! Once you grab the pole, release Action, and then press it again to grab the second pole. Do not let go of Action! Wait for the fire on the opposite ledge to go out first, then release to land on the ledge. Immediately hop backwards before the fire comes back on. Phew! Turn left and walk to the front left corner of the ledge. Take a standing jump to grab the opening and pull up. Tightrope-walk over to the other side and pick up the Bottle Of Chloroform. If Lara loses her balance during the tightrope-walking, do not forget to press the opposite directional key until she regains it. Slide down to finally land in front of a crawlspace. Hallway with aquarium - The music here alerts you that someone or something dangerous is outside. It is a guard patrolling the nearby hallway. Do not crawl out there until you see him going to the left. Then you can crawl outside and head to the right of the hallway (as there is nothing interesting on the left). The guard is acting on instruction to patrol to the left and right ends of the hallway so long as you do not attract his attention before crawling out. If you do, he will stay close to the aquarium on the right. There is a possibility however that the guard will not patrol to the left no matter how careful you are, which makes the next part more difficult to complete. If this happens, then just after he goes to the right, wait for a few seconds and crawl out. 2nd Secret (2-3\ total: 32-36) - In any case, you need to follow the right hand part of the hallway and stand in front of the aquarium. Since you will have probably attracted the guard's attention by this stage no matter what, he will shoot at you carelessly and the aquarium will shatter. If you crawled out a few seconds after he went to the right, sprint past him towards the aquarium and he will shoot it before you get there. Pick up the Golden Rose from inside and immediately roll and sprint around the right hand corner of the aquarium. The guard does not follow you there, so you will be safe. Head up the ramp. Once you are up, a sniper targets Lara. There are two ladders behind the ramp, but only the left one leads to the upper ledge. To avoid the sniper you can stand in the middle of the ramp, turn around, and take a standing jump onto the ledge (see this screenshot to get oriented). Climb up the ladder and drop down onto the ledge on your right. Follow it around. The sniper will target you two more times, but do not stop at all now until you reach a button on your left. 3rd Secret (3-3\ total: 33-36) - Before pressing the button, look for the fire extinguisher on the right (as shown here). If you do not want to lose health in the next part, stand having the button on your left. Now take a standing jump and keep running until you reach the ladders. The sniper will try to shoot you but hit the fire extinguisher instead, blowing up a section of the wall and revealing an alcove. Back track, enter the alcove, and pick up the Golden Rose. Second aquarium and electrified floor - Exit and push the button to deactivate the lasers and open the door below. Hang from the edge and release to land on a platform in front of the door you just opened (if you do not want to lose health, return back to the ladder and descend it). Enter the hallway ahead and start sprinting. When you pass in front of the first door on your left, a guard will emerge from it. Keep running and jump over the lower part of the floor, as it is electrified. Stand in front of the aquarium facing the button on your right, and start jumping up to avoid the bullets from the guard. The guard will miss you eventually and shatter the aquarium, which floods the lower floor. Now you can step on it. Jump towards the button. Then press it to open the big double doors and the doors opposite, which realease an armored guy (those second doors include a Large Medipack. If you are brave enough, go and get it). Enter the lounge on the left. The door closes behind you. In the cut scene, Lara explains to Zip that the guards are trying to cut the door behind her using welding torches. Zip hastily tries to locate Lara, and once he does so, he informs her she is in a room with motion sensors, and that she needs to move slowly as a result. Just to let you know, in a different case you activate the gun turrets. So, whilst Walking, press the two buttons - one on each side of the exit. Keep Walking until you pass the double doors you just opened. Then you can run. Go to the end of the hallway and through the door that automatically opens on the right. Teleport room\ room with 7 cases - Go through the doorway on the left to reach a small lighted room with seven cases. Do not open any yet. There is a trapdoor directly above the entrance. Stand facing the entrance and jump up to grab the handle and open the trapdoor (see here if you cannot find the trapdoor). Climb through the duct on the right, crawl to the end, and somersault into a dark room. You should be able to see the room with the suitcases on the right. Press the button to activate the scanner and locate which case contains what you need. Return to the lighted room. The camera uses the scanner and helps you to see the correct case. Stand with the camera to the back of you and open the case to get the Teleporter Disk (needless to say what happens if you open a wrong case. BOOM!). Return to the teleport room, by crawling beneath the trapdoor that sort of half blocks the entrance. Use the Disk in the panel next to the entrance. This deactivates the big X lights in the middle of the room. Place the Iris Artifact in the receptacle there. Lara will be teleported to another room that has only a hole in the floor. Drop through it and climb up to the next ledge. Zip talks to Lara in the next cut scene, telling her to watch the guard carefully and make note of the code he enters into the keypad. If you did not see the code during the cut scene, wait for the guard to come out and use the keypad again. Get the code he enters (1672) and continue forward to a crawlspace. Wait for the guard to use the keypad again. When he goes through the door, crawl out. You should be able to see a Bottle Of Chloroform opposite the door. If you want to take it (in case you missed the previous one, or you just want all the pick-ups), you will need to go back to the crawlspace again and wait for the guard to both exit and enter again. This is because you will not have time to complete the next part without getting killed. When you are in the crawlspace, wait for the guard to pass in front of you. When you see him going towards the keypad, crawl out a bit. Use the Look button, and when you see him using the keypad, crawl out and start Walking towards him. He will not notice you if you do not approach him a lot. When the door closes, enter the code and go through the door. You can normally run to a position about halfway down the hallway before Walking becomes essential. Stand behind him. • First way/ use the Chloroform - If you made it on time, combine the Cloth and the Chloroform if you have not already done so, and use it on the guard. Do not press Action, even if you have already combined them before. Instead, enter your inventory and press Use. • Second way/ ignore him - If you wasted a bit of time during your activities a couple of paragraphs ago, and whilst you are behind him the guard turns left with intention to leave, do not move. Just turn around and wait for him to exit through the door. He will not notice your appearance! Room behind the first scanners - In any case, get the Large Medipack behind the crate with the circles. Then press the button to deactivate the scanner and open a door which previously was preventing you from continuing on into the next area (the button is on the left column, assuming you are facing the door). Crawl through the red opening on your right and climb up the ladder. If you did not open the trapdoor at the beginning of the level, it opens now as you approach it. Crouch and somersault to reach the small lobby where you started the level. Retrieve the HK gun from the tray. (Note - When you pick up the gun, immediately jump backwards and do not stay close to the tray because you may trigger the cut scene where Lara leaves the gun, as she did at the beginning of the level.) Now you have deactivated the scanner ahead, you can cross the hallway holding your gun. Go to the end. The lasers are still on the right hand side of the hallway, so go to the left. Use your gun to shoot the fire extinguisher next to the security camera (as shown here). This will blow up the exit door. Go through it to end the level. The cut scene shows a guard entering Von Croy's office. He informs Von Croy and an older man that the last visual contact of the intruder was in the lobby. The older man says that all the exits are blocked, and asks if they have identification. Von Croy uses a large camera and tells them it is Lara Croft. The older man says she has no chance of escape, and orders the guard to place the building on full alert.
|
||
| « Level 11: 13th Floor | Index | Level 13: Red Alert! » |
|
Copyright © www.tombraiderchronicles.com |
||