Tomb
Raider Chronicles Walkthrough and Game Guide
Featuring All Secrets and Hidden Rewards and packed with Screenshots
Level 4: The Base
(*We do not count the worker that Lara kills in the cut scene.)
|
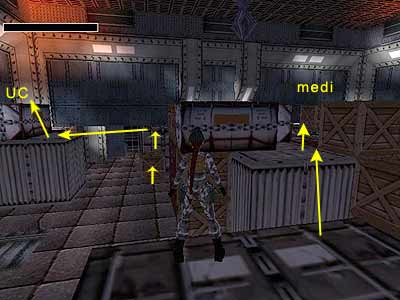
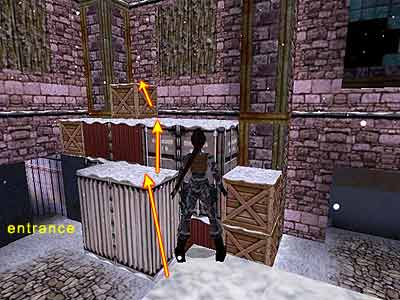
The FMV shows Lara looking at the Base from afar through her binoculars. She zooms in at a car looking at a man. Charles Kane* tells her that most of them are ex-KGB (trained killers). Lara does not seem to be surprised, as she has dealt with Mafioso before. Charles also tells her that there is a nuclear submarine housed in one of the dockyards. He gives her a tracking device. Lara runs down the hill and Charles Kane leaves with a snowmobile. You enter the Base sliding down a duct and dropping onto a hallway. Follow it to the right and go down the ramps around and to the left until you reach a big blue door that is already open. Go through it to enter a room with several boxes. When you enter the room you activate the alarm, and the cut scene shows a worker moving a big crane thing around the room (guess whom he is trying to grab!). Room with crates - You can easily avoid the crane by running around the room without stopping. Head forward towards the well lit metal doors. If you keep an eye on the left, you will see a metal locker behind the boxes. If you cannot see it, go straight to the metal doors. The locker is on the left. Open it to get the Silver Key. The crane cannot reach you here, so do not be nervous. Turn around so the locker is behind your back, and go to the far right corner of the room behind the stacked boxes, your goal being to reach the closed doors. Use the Key in the lock to open the left one. Enter the hallway and go up the stairs to the right. There are two soldiers in the next room. If you are quick, stand in front of the window and shoot them before either can get out. Pick up the Swipe Card that one soldier drops and if you have not entered the Control Room, do it now. Open the metal locker to get the Uzi and return back to the main room with the boxes. 1st Secret (1-3\ total: 10-36) - Go to the far left corner of room - to the left of the metal locker. Use the Card in the socket to open the door. Enter and kill the dog that attacks. The dog is pretty fast, so if you are having trouble, run and jump to the top of the nearest crate to the doors and kill it from there. The hallway seems to be a dead end. Shoot the grate on the right of the ducts and climb through the opening to get the Golden Rose. Return back to the main room with the boxes. Head to the left, passing the first metal locker you opened (where you got the Silver Key) to reach the closed doors. Use your Card in the socket to open them. Enter the hallway and go up the stairs to reach the balcony. Walk to the edge where there is no railing. Escaping from the crane - The deal here to reach the right hand part of the room and climb onto a balcony. You have to do it by jumping from box to box avoiding the crane. You may want to save your game here. If you need a visual guidance, see this page. Take a running jump to the metal box below and to the right. Keep running to the left and jump on the stacked boxes in the middle of the room, the pile with the wooden crate at the top. To make sure you land on the stacked boxes straightaway and not have to grab/ hoist, jump from the right hand corner of the metal box. When you are there, stand next to the crate, having it on your right. When you see the shadow of the crane above you, tap back once and hang from the edge. Immediately shimmy to the right and around the corner to another crate. Pull up and then take a running jump to grab the stacked boxes ahead with the crate on the top. Turn right to face the corner of the crate and take a standing jump to land on it. Keep running, and jump to grab the edge of the balcony. Then pull up (phew!). Follow the balcony around and push the button to open the next door. Enter the Control Room. The cut scene shows Lara killing the worker who was moving the crane around. She uses the levers on the panel to move the crane and destroy a huge door on the other side of the main room. There are two lockers in the Control Room. Get a Small Medipack from the right and Uzi ammo from the left one. Push the button on the right of the lockers to open the door. You are back at the first balcony where you began the running. You can go through the door you destroyed by dropping onto the floor and heading over to the other side of the room, but you will miss two pick-ups if you do this straight away. If you are not interested in the pick-ups, skip the next paragraph. Take a running jump to the metal boxes below and on the right, and then to the stacked boxes on the left and in the middle of the room, as you did before. Go to the other side of the boxes and jump onto the next set of stacked boxes to the right of the exit door. Climb onto the crates and get the Small Medipack. Drop onto the ground and head to the entrance of the room, close in fact to where you started the level. Facing the entrance, climb on the low crate to the right and then on the upper boxes. Turn around, stand on the corner, and take a running jump to land on the metal box to the left. Clamber onto the upper boxes and get the Uzi ammo (this screenshot shows the location of both pick-ups). Drop down and go through the exit. Dockside - Enter the tunnel and kill the two soldiers that appear at the far end. Go to the end of the tunnel and follow the left opening to arrive outside at the dockside. 2nd Secret (2-3\ total: 11-36) - Head to the right and jump onto the train car. From there, climb onto the box ahead. Turn left and climb on the box that is hanging from the crane. Stand on the left corner of the box (towards the exit) and take a running jump to land on the metal box ahead. Do not press Action or you will not make it (see this screenshot to get oriented). Climb to the crate at the top and pick up the Golden Rose. Drop back to the ground. Use the Swipe Card in the socket next to the boxes to open the door. Enter the room and kill the soldier that appears behind the machine. Pick up his Silver Key and go behind the machine now. Make a mental note of the fact a fuse is missing. You will soon return here to remedy this. Exit the room and head to the door from whence you came. Go back to the tunnel and go through the opening on the other side. Go up the stairs and use the Key at the top to open the door. Step outside. The cut scene shows Lara watching Mikhailov (the Mafioso) and Yarofen (the admiral) talking to each other. Nothing special about this cut scene; we are just getting know the two big bosses of this part of the game. Each one tries to establish his ascendancy, but Mikhailov is the one who gives the money. Yarofen though feels offended, telling him that he is not like him (Mikhailov). They both leave the scene and board the sub. Follow the walkway to the right and take a running jump to grab the opposite ledge. Pull up and go to the left. Again take a running jump, this time to grab the edge of the walkway opposite. Pull up to get the Desert Eagle ammo and the LaserSight. Safely drop to the ground and use the Card to open the door beneath the walkway where you entered this area. Locker Room - Enter the hallway and then the locker room on the right. Kill the dog inside (it will not follow you to the front of the lockers). Search the metal lockers to get the goodies; Uzi ammo, A Fuse, Small Medipack, Desert Eagle ammo and Desert Eagle gun. 3rd Secret (3-3\ total 12-36) - Go to the other side of the locker room where the showers are. Head to the far right corner and open the trapdoor. Drop through it and follow the tunnel. At the first T-junction, swim to the right (the left way is a dead end). Swim to the end of the tunnel and climb out of the water. Pick up the Golden Rose and return to the locker room. Dockside again - Push the button on the left to open the door. Then return to the tunnel. Head forward to the opening to go outside again. This time there are two snipers behind the two upper windows. You can either kill them or avoid them. If you want to kill them, jump to the crate that hangs from the crane, and from there to the metal box, close where you got the Secret. Turn to face the broken window where the first sniper is, above the entrance of this area. He cannot shoot at you often, and the other sniper does not even bother. Kill him using the Desert Eagle combined with the LaserSight or the Pistols, although it will take more time. When you are done with him, head back to the crate that hangs from the crane and kill the second sniper. Enter the room where the machine is. Go to the back of it and place the Fuse. This opens the door in the same room and turn on the fans. Kill the dog that emerges from outside and go through the opened door. Push the button to move the crane to the other side, towards the submarine. Exit the room, but do not forget the snipers if you have not already killed them. Exiting the room, run towards the red box ahead that is on the train car. Jump just before the step to grab the red box. Pull up and turn left. Take a running jump to grab the box that is hanging from the crane. Then pull up. If you have not already killed the snipers, they may shoot you twice now, but you will only lose a small amount of health. Jump towards the submarine to end the level. The cut scene shows Lara landing on top of the Submarine. She attracts the attention of a sailor, and sneaking behind him she brings him down. She then runs into the Submarine. * Jean Yves Empereur first appeared in The Last Revelation as a famous archaeologist and Lara's friend. Neither CORE nor EIDOS had asked his permission. Jean then asked EIDOS stop using that character who resembled him so much. You can read a full atricle here. So, in TRC he appears slightly different than in TRLR and his name is Charles Kane.
|
||
| « Level 3: Colosseum | Index | Level 5: The Submarine » |
|
Copyright © www.tombraiderchronicles.com |
||