Tomb
Raider Chronicles Walkthrough and Game Guide
Featuring All Secrets and Hidden Rewards and packed with Screenshots
Level 3: Colosseum
|
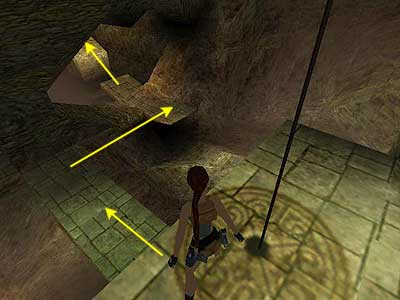
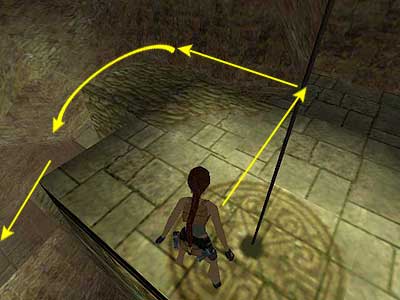
After sliding down, head forward through the opening. 1st Secret (1-3\ total: 7-36) - In the second room, notice the movable block on the right, just after the step. Push it as far as it will go to reveal a secret room. Pick up the Golden Rose from the right hand corner and return to the passageway. Turn right, passing all the way through the hallway until you reach a long narrow corridor. When you reach the middle part of it, a brief cut scene will show part of the floor collapsing, revealing a lava pit. As soon as you gain control of Lara again, keep running forwards and jump to clear the gap and avoid falling into the lava pit. Grab the edge of the ledge and shimmy to the left around the corner. Pull up into the crawlspace and somersault at the edge, by pressing forward and Jump together. Push the button to open a door in the room above and return back to the crawlspace. Crawl backwards, hang from the edge, shimmy to the right, and pull up. Enter the room and head to the right. Follow the hallway to the end and slide down the ramp with your guns equipped. Kill the lion that emerges from the right and push the button on the left wall to open the door on the other wall. Immediately roll and kill the lion that emerges from the next room. Enter the next room and climb up the ladder. Turn around and get the Gemstone Piece #1 from the pedestal. Area with alcoves and ramps - Exit through the doorway. A knight is charging towards you from the left, so kill him and pick up the Small Medipack from the alcove. Return back and head up the ramp on the left. A second knight charges you from an alcove on the left, so take care of him too. If you are having trouble with the knights and the forthcoming lions, run to the middle of the ramp and kill them from there, where they will not follow you. Enter the alcove, pick up the Uzi ammo, and push the button to open a door on the upper level. Exit and make your way up the second ramp. You should be able to see a big room on your left and another ramp directly ahead. Ignore the big room for now and go up the ramp, killing the knight and the lion that come from the left alcove. Enter the alcove, and pick up the Uzi and the Large Medipack. Return back down the ramp and enter the big room. Area with platform\ Timed puzzle - Walk to the middle of the platform where the brown circular ledge is. Turn left and take a running jump to land on the ledge where the chain is. Make sure you press Action whilst jumping or you will hit the stone. After pulling the chain three times, a pedestal with the Gemstone Piece #2 is raised and you have about 30 seconds to reach the central brown platform again and grab the Piece. There are many ways you can do it, but we will provide two of them. Fist way - Stand in front of the chain facing the central platform and pull the chain three times. Drop onto the ledge ahead and run-jump to the ledge on the right. Keep running and jump to the stone ledge ahead (as shown here). Jump at the edge and grab the opposite ledge. Then pull up. Continue running to the left and around the corner, and jump at the edge to grab the central platform. Run to the pedestal and grab the Gemstone Piece. Second way - Stand in front of the chain with the central platform behind you, and pull the chain three times. Run to the left corner where the steps are (as shown here) and jump at the edge of the last step, landing on the upper ledge ahead. Keep running and jump onto the next stone ledge ahead. Jump at the edge to grab the opposite ledge and pull up. Continue running to the left and around the corner and jump at the edge to grab the central platform. Run to the pedestal and grab the Gemstone Piece. After getting the Gemstone Piece, follow the walkway to the right. The door opens when you approach it. Also, another gate beyond the door opens but closes as you pass. Walk forward and tumble through a trapdoor. The cut scene shows Lara sliding down and then grabbing the edge of a deep pit. Pierre appears, asking for the Stone. Lara tells him to pull her up and the Stone will be his. Pierre does not seem to believe her, and asks her to promise him she will not lay a finger on him. Lara promises, and finally he pulls her up. Lara backs him to the edge, and Pierre, terrified, asks for the Stone. A «Boo!!» is enough to make him fall and grab the edge of the pit. He asks her to pull him up, but Lara reminds him they had an agreement not to lay a finger on each other. As she is a busy girl, she leaves and Pierre falls into the deep pit. 2nd Secret (2-3\ total: 8-36) - When you gain control of Lara once more, turn right and approach the slide. Take a running jump over it and climb up the opening. If you cannot jump over the slide, hang from the edge, shimmy to the right, and pull up. Or, jump to the dark area, which you can stand on. You are back in the room with the timed puzzle. You have to make your way up to the central platform where you found the Gemstone Piece. You know the way. Go through the opened door where you fell through the trapdoor previously. The gate opens as you approach it. Jump over the gap, pressing Action at the same time to grab the opposite ledge, and also to avoid hitting the gate. Pull up and get the Golden Rose from the pedestal. Return back by dropping through the opening in the floor and sliding down. Lara will stop in the middle of the slide. Carefully turn to the right and jump to the ground. Alternately, you can jump over the opening, returning back the same way that you came. Room with collapsing floor - Run up the ramp. The door opens as you approach it. Go to the other side of the room, and if you have not done so, combine the two Gemstone Pieces to get the Gemstone - place it into the receptacle ahead. The brief cut scene shows the Gemstone turning, and the floor beginning to collapse. The ledge is ready to collapse and fall into the lava pit. Immediately roll and take a running jump, landing on a safe ledge located underneath the entrance. Or, after placing the Gemstone, tap back once and jump backward to land on the ledge. Turn around so the entrance faces the back of Lara. The camera does not help you, but you can use the Look button to aid yourself, locating an alcove ahead, beneath where you placed the Gemstone. Take a running jump and land in the alcove. Hang from the edge and shimmy to the left around the corner. Keep shimmying to the left until you reach the opposite side (again underneath the entrance). Enter the small room and climb onto the block. From there, jump up to grab the ledge above; pull up. A knight and a lion appear. Dispose of them both and collect the Colosseum Key 1 that the knight drops. Use the Key in the lock on the left of the big blue double doors. The cut scene shows a Statue coming to life. Killing the Statue - This time the Statue holds a hammer instead of a sword, and it hits the hammer on the floor creating a blue shock wave. If you are close to it, you lose health. It is easy to kill it. Equip the Shotgun and shoot at it. If you run out of ammo, Lara will equip the Pistols automatically, so keep shooting with them. To pause the challenge, you can go back to the hole and drop through. The Statue will follow you and stop directly above you, so keep shooting at it until you kill it. Once you are done, a door opens in the room where the Statue was. Climb up and get the Colosseum Key 2 from the pedestal. Return back to the room and use the Key in the lock on the right of the big blue double doors. Slide down the ramp to drop onto a ledge. 3rd Secret (3-3\ total: 9-36) - Before getting the Stone, take a running jump over the pit and land on the opposite ledge. Again, take a running jump and grab the opposite ledge. Pull up and crawl through the opening to get the Golden Rose. Return back to the ledge that you dropped onto after sliding, and then use the Crowbar to pry from the wall the Philosopher's Stone. This will end the level.
|
||
| « Level 2: Trajan's Markets | Index | Level 4: The Base » |
|
Copyright © www.tombraiderchronicles.com |
||