Tomb
Raider Chronicles Walkthrough and Game Guide
Featuring All Secrets and Hidden Rewards and packed with Screenshots
Level 7: Sinking Submarine
|
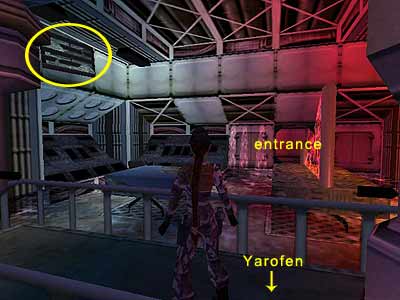
The cut scene shows Lara returning to the Sub. Whilst taking off her diving suit, Mikhailov enters the room along with two of his men. He asks Lara about the artifact she found, and Lara, having no other choice, gives it to him. Mikhailov then orders his men to take Lara into the torpedo room and eject her into the ocean. Whilst his men begin to follow his orders, Lara tells Mikhailov that he does not know what he is dealing with. He does not seem to listen to her. We then see him be zapped by the artifact. The lights of the Sub go out and we hear Lara disarming/ hitting the two men. When the lights are back the two men are on the floor. You are back in the Sub. You will recognize some places from a couple of levels ago, but some of them will be new to you, as you will now be able to open doors you previously could not. Also, you will not be able to access some areas now that you could before due to the destruction that the artifact has caused. When the cut scene ends, climb down the ladder on the left to reach the room with the torpedoes. Kill the sailor that comes from the other side and pick up the Uzi ammo he drops. When you reach the T-junction, another sailor comes from the right. Take him down and pick up his Desert Eagle ammo. Since the left part of the hallway is a dead end, go to the right and climb up the ladder. If you follow the hallway to the end and around to the left, you will see a closed hatch that needs a card to open it. Exactly opposite the hatch is a Storage Room, and the trapdoor above the crate leads to a destroyed duct you cannot pass. You can see an opening on the right which leads to a flooded hallway with two fires on the floor (beyond is the Mess Room). You have to go through that hallway and jump over the fires. Flooded hallway with two fires - To get past the first fire, stand with the middle waterfall on your left (as shown here) and take a standing jump. If you get burned by flames then immediately roll or duck in the water. Enter the Storage Room on your left and get the Uzi from the selves next to the crate. Exit to the hallway and jump over the second fire. To get past it, stand in the middle of the entrance to the Storage Room and take a standing jump. When you pass the hatch, a brief cut scene shows three electrified wires swinging in the water of the now flooded Mess Hall. Mess Hall - You must avoid the water or your health will go down very quickly. Walk to the edge, but be careful not to step in the water. Take a standing jump to the first table (stay on the left), then another standing jump to the second one, and finally another standing jump to the third. Do not try to go in the Kitchen, as there are electrified wires in there as well. You have to go to the opening at the end. So, jump to the table on your right and then to the opening, making sure you press Action during both jumps. If you do not you will hit your head on the duct above you and fall in the water. Alternatively, jump directly to the opening by standing on the left hand corner of the table and taking a running jump towards it, pressing Action to land. Seeing how the left hand part of the hallway is a dead end, go to the right instead. A hatch that was previously closed in the Submarine level is now open. Kill the sailor inside and pick up the Swipe Card he drops. Also, get the Small Medipack from the shelves close to the crate. You have to make your way back to the flooded hallway with the two fires on the floor. So, exit the Storage Room and head back to the Mess Hall. Be careful because the water is still harmful! Take a standing jump to the first table (stay on the left), then another standing jump to the second and finally a further standing jump to the third. Turn right and walk to the edge of the table. Take a standing jump to the opposite table, pressing Action to cut Lara's momentum and enabling yourself to avoid hitting the duct. Again, take a standing jump to the opening on the left, pressing Action to land directly on it. You are back in the flooded hallway with the two fires. Jump over those fires now, and at the T-junction turn right. Follow the hallway to the end and use the Swipe Card to open the hatch. Head forward and look for the doorway on your right. There are electrified wires swinging in the water. You cannot pass them now, so continue on to the ladder ahead. Climb it all the way to the top. There are more electrified wires in the Control Room to your left. You can go there now if you want, but it is more sensible to wait until you have turned off the power. Continue ahead until you reach the rather flooded Control Room. Here you can step in the water, so go to the far left and open the hatch by turning the wheel. Then enter. The cut scene shows Lara finding Admiral Yarofen lying on the floor. He says that Mikhailov infected his ship and that they are all doomed. Lara tells him she can help them and escape through the pod, as the ship is about to impact into the ocean bed. Yarofen tells her the pods have no internal air supply, but that maybe she can find oxygen tanks in his stateroom (he gives her a key). After the cut scene you have a Silver Key in your inventory. This will give you access to Yarofen's stateroom. If you climb the ladder next to Yarofen, you will notice two receptacles. You need to insert the oxygen that he told you about into that. Turning off the power - For now, exit back to the flooded Control Room and look for the two gratings on a duct in the left hand wall. One of them (the right one) is breakable (see this screenshot if you cannot find it). Climb onto the ledge that is used like a map in the left corner of the room and face the unstable grating. Jump up and shoot to break it. Walk to the edge and take a standing jump to grab the duct; pull up. Crawl to the right and then left around the corner. Open the trapdoor and drop onto the crate. There is a switch on the wall, opposite the shelves. To use it, stand under the switch and jump up, pressing Action to grab it. Now you have turned off the power in some parts of the Sub. You cannot open the door here (you will be back though for a Secret), so return to the duct and then to the flooded Control Room. Exit through the doorway you came in before. Now you have turned off the power, the wires in the first Control Room are not electrified, and you can step inside there safely. Pick up the Large Medipack, the Desert Eagle ammo and the Desert Eagle gun from around the room. Do not be afraid to walk between the wires. They cannot harm you now. Finally, get the Nitrogen Canister from the control panel in the far right hand corner of the room. Exit to the hallway and climb down the ladder on your right. Admiral's Stateroom - The wires in the left hallway are not electrified any more, so follow it to the end and use the Key the Admiral gave you to open the door. Enter the Stateroom and get a Small Medipack from one of the metal lockers on the left, and the Oxygen Canister from one of the metal lockers on the right. Exit to the hallway and take care of the two sailors that come from the other side. One of them drops a Bronze Key. 1st Secret (1-2\ total: 17-36) - Go to the left of the T-junction, pass the small Storage Room by turning right, and return to the flooded hallway with the two fires on the floor. Jump over these fires and enter the Mess Hall again. You can step in the water here now, as you have turned off the power. Enter the Kitchen on the left and pick up the Golden Rose. Return to the hallway that leads to the Stateroom and continue ahead to climb up the ladder, heading back where you got the Nitrogen Canister. 2nd Secret (2-2\ total 18-36) - Enter the second flooded Control Room and again climb up to the duct as you did before in order to turn off the power. In the small room where you used the switch, there is a locked door that beforehand you could not open. Now you have the Bronze Key, use it to open the door. Get the Golden Rose from the drawers and return to the flooded Control Room via the duct. Again enter the room where Admiral Yarofen is lying on the floor and climb up the ladder next to him. Place the Nitrogen Canister in the left receptacle to open the right hand receptacle. It is here you that should place the Oxygen Canister. The cut scene shows Lara climbing down the ladder and going back to Yarofen, the intention being to help him. He tells her to escape without him, but Lara does not want to do that. Yarofen tells her that the airlock can only be opened from inside the ship. So, someone must do that. This is a gift from Yarofen to Lara. Lara's gift to him is to tell his story, that the Russian navy fought against the inside enemy, so their country might once again stand proud. That is the deal, and Lara returns to the airlock. The hatch closes behind her.
|
||
| « Level 6: Deepsea Dive | Index | Level 8: Gallows Tree » |
|
Copyright © www.tombraiderchronicles.com |
||