Tomb
Raider The Last Revelation Walkthrough and Game Guide
Featuring All Secrets and Hidden Rewards and packed with Screenshots
Level 6: KV5
|
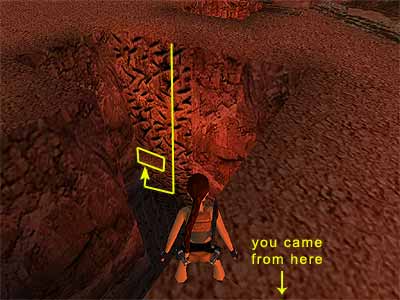
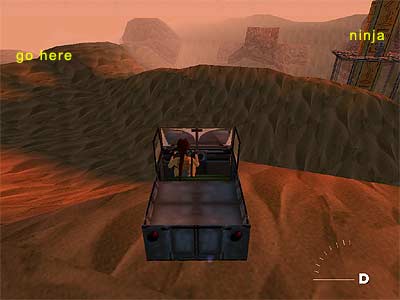
You still have the jeep in this level, and as with the previous one you can explore on foot now and then. Be warned though that you need the jeep in order to finish the level! Get out of the jeep and pick up the Large Medipack and the Shotgun Wideshot ammo on the left hand side of the room. The guide is still there throwing grenades at you (they are harmless in the PC version). Get back in the jeep, run over the steps, and drive up the ramp to the left. Pass the sandy area with the huge statues by going through the opening on the other side. There is a ninja on top of the scaffolding in the next area. Drive towards the support poles beneath him and knock them down like skittles. Then do a quick U turn to come back the way you came so you can run the ninja over, all the time being careful of the spiked pit. When you are done, drive towards the opening on the far side to proceed to the next area. 1st Secret (1-4\ total: 22-70) - Before going through the opening, get out of the jeep and climb up the rock to the right. Crawl into the alcove and get the Large Medipack. Return to the jeep and drive to the next area. If you pass between the two scaffoldings, you will trigger a ninja on the left one. Since you will need to pass through them anyway, do that now with your jeep. Hurl the vehicle towards the scaffolding and bring the ninja crashing down to earth. Then make a U-turn and run him over like you did the ninja in the previous area. Leave the jeep now and get the Large Medipack from the alcove on the left of the closed gate. There is another ninja in this area that comes from the right scaffolding. You trigger him if you step on a specific block. This scaffolding has two levels. You can climb up to the lower of those levels from two openings - one in the middle and one at the right corner. If you avoid the passageway between these two openings, you will not trigger the ninja (unless you are interested in all kills). So, climb up through the opening in the middle and go to the left to pick up the Shotgun Normal ammo at the end. Drop onto the ground, come back out through the same opening you went in, and climb up onto the same scaffolding from the opening at the right corner this time. 2nd Secret (2-4\ total: 23-70) - Climb up onto the block ahead and drop to the ground. You are now inside the scaffolding. Follow it to the end around the corner to the right and pick up the Large and Small Medipacks. Return back to the opening of the scaffolding and climb onto the upper ledge. Pick up the Large Medipack from the alcove on the right and turn around. Take a running jump to grab the rope, swing, and jump to the opposite ledge. Go to the right and stand underneath the switch. Jump up, pressing Action to grab it. This opens the gate below. Hang from the edge of the ledge and safely drop onto the ground. (Note about the gate - This gate is open until the guide's van passes it. After the van passes it, it closes. That's why you have to open it then. It is possible to outrun the van from the beginning of the level and get out of that gate while it is still open, but since it closes after Lara's jeep and the guide's van have passed it, you will not be able to get the first two Secrets. If however you want to try it, and do not mind losing the Secrets, here is how: after getting the pick-ups at the beginning of the level, get in the jeep. As soon as you ride up the low steps, the van starts to move. You must not waste time here. Immediately turn left and stick to the right wall. Drive parallel to the van, and if you do not touch it you will be able to pass in front of it. Keep driving. When you reach the area with the slope and the scaffolding, the van will most probably will be right behind you. Run up the sandy slope, and at its highest part turn a little bit and drive in a diagonal direction to pass through the opening that leads to the next area. Hopefully this will cut the jeep off in its path, which is coming from the low path on your right. Keep driving, turn left between the scaffoldings and pass through the open gate. The van will follow in a fraction of a second and the gate will immediately close.) Behind the gate - Get the jeep, and once you drive through the gate, dismount. There are some columns with ledges on each side of the opening. Get a Large Medipack from one on the left and the Uzi ammo from one on the right. Now you can decide if you want to complete the next part on foot or by driving the jeep. Heading up the ramp, you will trigger three rolling spikes that come from different holes in the ceiling. The order they come out is: right - left - right. This means that you need to start your ascent up the slope by hugging the left wall, then moving to the right to avoid the first spike, and then back to the left again, and so on. 3rd Secret (3-4\ total: 24-70) - Stand underneath the hole in the ceiling that is located at the upper part of the ramp. Look for an opening above. Jump up to grab the edge and pull up to get the Grenades Normal ammo. Some times Lara refuses to grab the edge. In such a case you should turn around and take a standing jump to grab the wall opposite the edge. Do not climb up the wall at all. Simply perform a back flip. Drop to the ground and return to the jeep. Continue downhill through the cave, driving to the left to avoid the spiked pit. When you reach the outside area, look out for the two adjacent pits. Get out of the jeep. 4th Secret (4-4\ total: 25-70) - There is a ladder inside the big pit (see here to get oriented). Climb down it until you reach the opening. Crawl through this opening and get the Shotgun Wideshot ammo and the Crossbow Normal ammo. Climb back up. (Getting through the opening is quite tricky. Lara initially refuses to climb through it. In order to do so, release Action and then press it immediately to grab the edge again, so that Lara is hanging with her hands. Again, immediately press the Duck and Up arrow keys at the same time before Lara takes the climbing position.) Return to the jeep and carry on forwards, being careful not to fall foul of the spiked pits. You finally reach a dead end with an opening on the left. Drive through this opening. [Note about the Jeep - If you have reached this part and do not have the jeep, you need to go back and get it; otherwise you cannot end the level. If the jeep is trapped outside the gate that is blocked by the rolling spikes, you still can get it. Just jump towards the spikes and Lara will go through them (without getting damaged, in the PC version at least). Get the jeep and drive through the spikes. You lose some health.] Getting past the sandy hills - To get past the sandy area with the hills, drive to the middle of the first area. Keep pressing Action and the jeep will ride the hills without stalling. When you reach the second area, you will be able to see a spiked pit on your left. Pass it, and when you reach the top of the next hill, turn left. There is scaffolding with a ninja at the top in the next area. Drive to the left to avoid the next spiked pit. You can kill the ninja if you like, but given the fact he does not have any goodies hidden in his turban, you are better off ignoring him. Continue to the left and you will reach the last area (as shown here). Drive through the cave on the right to end the level.
|
||
| « Level 5: Valley of the Kings | Index | Level 7: Temple of Karnak » |
| Copyright © www.tombraiderchronicles.com |
||