Tomb Raider 3 Walkthrough and Game Guide
Featuring All Secrets and Hidden Rewards and packed with Screenshots
BONUS LEVEL: All Hallows
Note - In order to access this level, you must have found all 59 Secrets of the game. The PC players carry the weapons and ammo from the Meteorite Cavern and the PS players have only the Pistols.
|
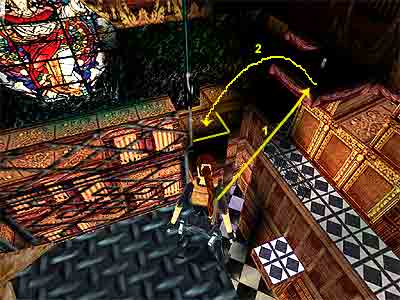
You begin the level sliding down a ramp. Whilst sliding, press Jump and Roll in order to jump and twist in midair. Press Action to grab the edge of the ramp. Release and immediately press Action to grab the "invisible" crevice below. Shimmy to the left until you can pull into a crawlspace. Drop down on the other side and take a standing jump to grab the grates above the spikes. Traverse across and pick up the Flares and the Crystal. Jump to grab the grates again, traverse back, pull into the crawlspace and drop to the ground. [Note - If you miss the crevice, you can either load your game or get the pick-ups from the ground. Climb up the block on the left hand side and take a running jump to the flat ledge of the dome. Then take a running jump to grab the crevice. See this screenshot to get oriented.] Having the ramp you slid at the beginning of the level to the back of you, climb up the block on the left hand side. Jump up to grab the grating above and pull up. Take a running jump to the opposite ledge and go around to the right. Take a running jump to grab the next ledge and pull up. Go around to the right and, again, take a running jump to the next ledge. You now face the wall with the ramp you came from and you should also have a pillar on your right. Vault onto the low grating. Or, climb up the block on the left hand side, take a running jump onto the dome and jump onto the grating (as shown here). Jump to the bent grate ahead, where its right hand part is flat and has railings. Go to the right and pull onto the upper grating. Turn left and jump up to grab the grate above. Pull up and pick up the Uzi Clips (or a pair of Uzis for the PS players). Carefully drop back to the lower grate and then to the bent one. Having the railings on your left, jump up to grab the grate and traverse to the opposite ledge, getting past its railings (any explanation why there is scary music when you drop on this ledge?).Take a standing jump to grab the crawlspace, pull into and get the Small Medi Pack. Drop into the hole ahead and get the Crystal (see this screenshot for these pick-ups). Crawl back out and drop to the ground. Lara will lose about 25% of health, but do not use a Medi Pack now if you do not have many. You will see later. Make your way back up to the ledge just prior jumping to the bent grate (where Lara is standing here). Turn right and climb on the upper ledge. Take a running jump to grab the ledge ahead and pick up the Flares. Turn around and notice the two pillars. The right hand one has railings. Take a running jump to this pillar. Dropping into the Cathedral - Make sure that your health is at 100% or you will not make it, because a long frop follows. Stand against the railings and jump up to grab the grates above. Traverse until the middle of the last square, but not to the very end or Lara will release by herself and drop down at the bottom of the room. Drop to the pillar below and press Action to grab the edge of the slide. Below you can see the decrepit tiles. Release to fall through them and you will land on a catwalk below. You can press Roll before landing, to soften Lara's fall a bit. You are left with almost 20% of health, so pick up the Large Medi Pack that you probably need by now. Inside the Cathedral - Stand having the crashed floor to your back. Walk to the edge of the catwalk and notice the Flares on the dark ledge to the left. Take a running jump to this ledge. Turn left (the catwalk should be to your back and to the left) and take a look below. You can see a ledge with an opening and an extended pillar. Aim that pillar, tap back once and take a standing jump to it (see this screenshot). Drop into the opening and pick up the Large Medi Pack and the Uzi Clips. Climb back up on the pillar. Take a running jump to the walkway with the black & white tiles on the left. There is an opening above with a switch, but do not go there yet. Instead, head almost to the end of the walkway and take a standing jump to the black & white ledge with the Small Medi Pack (as shown here). Pick it up and turn having the railings to your back. All the bookcases are climbable, so jump to grab the wall ahead (there is a bookcase below, so the wall is climbable as well) and climb to the bottom. Turn right and go to the other corner of the room. There is an opening in the wall above, so grab the bookcase on the left hand side, climb to the top and dismount into the opening. Pick up the Large Medi Pack and throw the switch to open a door below. Take a diagonal standing jump to grab the bookcase and climb to the bottom. Having the opening you used the switch to your back, the door you just opened is in the far left corner (diagonally to the left). Go there and run above the decrepit floor that collapses as you run above. Use the switch to lower a platform with handholds, which is above the black & white walkway you passed before. Take a standing jump to grab the grating above the spiked pit and traverse back. Exit and grab one of the bookcases on the left. Climb to the top, dismount on the ledge and climb on the walkway. If you did not do it before, climb into the opening and use the switch to open a door in an area you have not been in yet. It is a door that leads to the exit, so make sure you have used the switch, so as to avoid back tracking later. Do not drop to the black & white walkway. From the edge of the opening, take a standing jump to grab the grates above and traverse to the left, passing beneath the platform you raised before. At the end, release and grab the ledge below. Pull up on the ledge, below the zip line. Turn around and climb up the ladder. Pick up the Vault Key and climb back down. (Bug note - Make sure you get the Key now, BEFORE using the zip line. Although you will have a chance to return back to the main room of the Cathedral later in the level, the handle of the zip line will not be on its starting position, which means that you will not be able to reach the other side of the line and end the level. Note also, that you will not be able to crawl backwards and drop to the black & white walkway. We are not sure if the handle is supposed to return back and this is a bug or if the handle needs to be at the end. In that case, you need to load a previous saved game before using the zip line, as we have not figured out yet how to reset the zip line.) Climb on the block with the the zip line. Grab the handle and ride the zip line above the spikes. Press the Look button to break the camera in order to see the ledge you need to land onto. Do not ride until the end because you will start sliding down and end up into a deep shaft and die. Turn around to face the spikes and notice the crawlspace on the left hand side. Take a standing jump to grab it and pull into. As you drop down on the other side, the bookcase on the right opens, revealing a passage. Follow that passage and drop to a ledge next to a spiked pit. Pick up the Small Medi Pack and take a standing jump to grab the grates above the spikes from the right hand side (if you traverse from the left, you will get burned). Traverse forwards and as soon as you hear a hard noise, release to drop into the pool below. Swim through the tunnel, but be careful of the crusher around the corner. Carefully get past it and climb out of the water. Crawl through the opening and when you are able to stand, turn around. Climb into the opening to get a Small Medi Pack and drop back down. Push the button to open a trapdoor in the main room of the Cathedral (and a door at the top of the ladder you are heading to) and crawl back out. Climb up the grating on the left hand side and watch out of the trapdoor at the top. If you step on it, you will land on a burner below and slide into the pool you were before. Then you need to pass through the crusher and climb up the grating again. To get past the trapdoor, take a standing jump, pressing Action. Exit to the main room of the Cathedral (the door closes behind you) and climb on the block to the right. (Note - Make sure you have used the switch that opens the exit door of the level, so as to avoid backtracking later. The switch is in the opening above the black & white walkway beyond. To return back, take a running jump from the edge of the opening you used the switch.) Drop through the trapdoor and into the pool below. Climb out of the water in a room with alcoves. There is a ladder on the right that leads to a closed door. To the left are two gratings that you can shoot. The left grating contains some Flares and the right one a switch that opens the door at the top of the ladder, in case you want to go back. When you use the switch, the two blades become active. To get past them, approach each one and stand about two steps away. Turn to the either left or right and side-flip when it gets to the horizontal position. Use the Vault Key to open the door and enter. Pick up the Large Medi Pack from the left and continue to the right. Drop into the water and swim through the tunnel. Beyond you can see a floating dead body. There is nothing interesting there, so swim through the tunnel on the right. To the left you can surface and to the right (where the two dead bodies are) you can find a Crystal. A guard and a dog are waiting for you outside. Climb out of the water and kill them. Climb up the ladder and turn around. Can you see the goodies in the next room? Well, as soon as you enter the room, the level ends.
|
||
| Index | ||
|
Copyright © www.tombraiderchronicles.com |
||