Tomb Raider 3 Walkthrough and Game Guide
Featuring All Secrets and Hidden Rewards and packed with Screenshots
INDIA: Jungle
*(Plus 10 friendly monkeys if you decide to kill them)
|
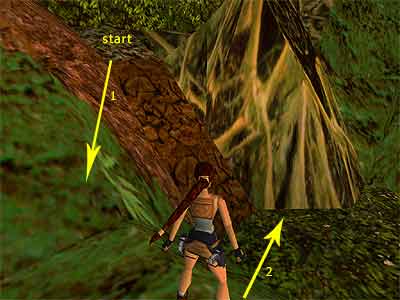
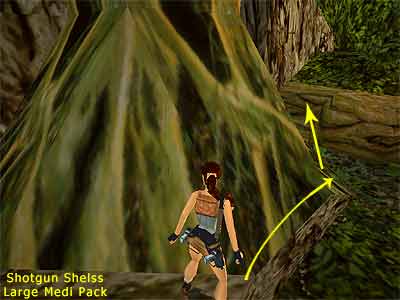
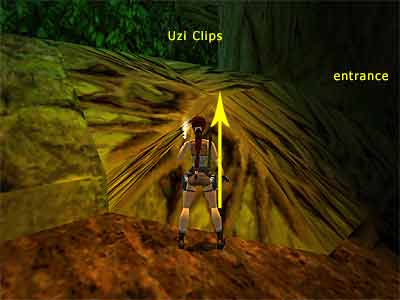
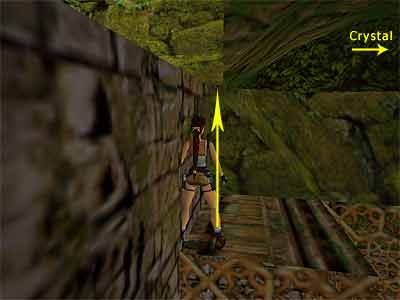
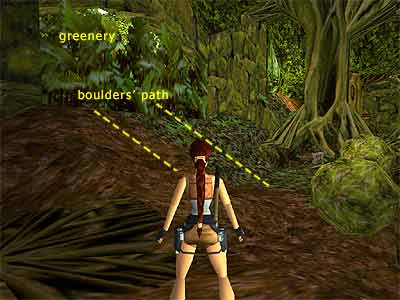
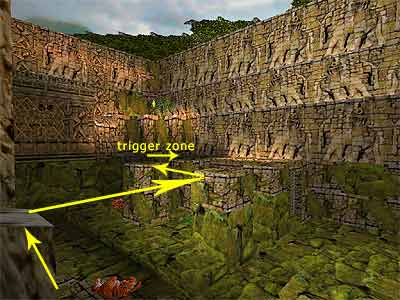
(Note about the monkeys - The monkeys in this level are friendly, so there is no reason to bother with them, unless you are interested in all kills.) 1st Secret - As soon as the level begins, walk forwards to reach the edge of the slope. Turn 45 degrees to the right and take a running jump to the flat green ledge at the bottom of another green slope. Turn left and stand having the green slope on your left (and the rest of the long slope on your right). You can see a yellow-green tree root in front you. Take a standing jump towards it to land on a flat ledge among the leaves (see this screenshot). Pick up the Shotgun Shells and Uzi Clips. Slide down the long slope until you land on a flat ledge next to some spikes. If you are interested in all kills, you need to jump and grab the tree that is lying halfway across the slope. Then pull up and kill the monkey up there. Facing down the slope, side step to the left to reach the angled part of the slope, and drop backwards to continue sliding, landing on the flat ledge next to the spikes. Take a diagonal standing jump to the left to continue sliding, ending on a flat ledge. Pick up the Shotgun Shells and the Large Medi Pack. Once you get the Medi Pack, do not move. A boulder is rolling towards you, so wait for it to stop. 2nd Secret - Side step to the right to reach the edge (the long slope should be on your right) and walk forwards to reach the root of the tree. If you use the Look button, you will see a flat ledge behind the tree root. Take a standing jump over the root to land on the flat ledge, pressing the left direction key whilst in midair if necessary (see this screenshot). Continue to the left and climb on the branch. Pick up the Shotgun Shells and get the Crystal. Walk up to the greenish edge exactly opposite where you got the Crystal. Turn around and slide backwards, pressing Action to grab the end of the slope. Let go of Action to drop onto a rocky ledge. If you do not press Action to grab the end of the slope, you will drop on another slope below, landing on a ledge at the bottom. You can then take a standing jump over the slope. Turn right and drop backwards to grab the edge of the rocky ledge. The camera changes view and shows Lara from a distance. Press the Look button if you want to break the camera, and release to drop onto the long slope. Slide down and you will land on a flat triangular ledge. Continue sliding to reach the bottom of the slope. Bottom of the slope - For now, ignore the courtyard ahead and go to the left to an opened area with a Crystal. Drop onto the ground and get the Crystal if you need it. Avoid the right hand part of the area because it is a big swamp, where Lara can be drowned (if you are careful, you can see that the ground is waving). 3rd Secret - Climb on the block to the left of the Crystal to reach the secret area. Drop to the other side and pick up the Grenades from the far left. The first alcove contains some Flares and the third one contains Shotgun Shells. (Note - At this point, you can skip the rest of the level, but you are going to miss several Secrets and pick-ups. If you are interested in seeing that, check this page.) Courtyard - Return to the area where you got the Crystal. Head towards the swamp on the right hand side, close to an opening. Here you can drop into the swamp, but make sure you do not go opposite the opening or you will drown Lara. Alternatively, you can take a diagonal standing jump to the opening or go to the left where the swamp leads to the opening from where you entered this area. Climb the opening and pull up, then go left and jump down to the courtyard. The courtyard you just entered is the one you saw before from above (at the bottom of the long slope). If you walk towards the center of the courtyard, a monkey will grab a Small Medi Pack and go through a passage on the other side (those monkeys are so friendly that they show you the way). Follow the monkey through the passage and pick up the Medi Pack it leaves. At the end of the passage you will find a switch. Throw it to open a gate back to the courtyard. Before going back through the passage, jump into the river and let the current push you to the right. Try swimming to the bottom of the river or the piranhas may get some of your health. When you are able to control Lara, look for a Small Medi Pack at the bottom of the river (you may need to light a Flare here). Exactly above the Medi Pack is an opening covered by greenery. Swim through the tunnel and surface at the end. Climb out of the water and go to the left to return back to the courtyard. Back to the Courtyard - The gate you opened (by using the last switch) is on the left, behind the tree trunk. Climb on the greenish block, then onto the tree. Go through the gate, but before dropping down notice the spiked wall on the left hand side. When you drop down, the gate closes behind you. Throw the switch on the opposite wall (and a bit to the right) and immediately roll and jump to the alcove opposite the switch to avoid the spiked wall that is coming towards you. Once it passes, drop back down and climb in the opening on the other side, where the spiked wall initially was. Walk to the edge and press Action to grab the handle of the zip line. Keep pressing Action until you reach the opposite trunk. If you accidentally fall into the water, the current will push you once again to the end of the river. Swim through the opening and follow the tunnel to surface. Climb out and head to the courtyard on the left. You need again to throw the switch in order to open the gate behind the tree trunk and use the zip line again. However, this time you will not encounter the spiked wall. Dark forest - From the bottom of the zip line, climb on the block and take a running jump to the opening ahead. Drop down on the other side and draw your weapons. Go through the opening and kill the tiger that is running towards you, coming from behind the rock ahead (you can jump on the rock and kill the tiger from there). Having the opening you came to the back of you, go to the right hand side to reach a slope. Face the slope and locate the corner that the rocks create on the right. Stand against this corner and take a standing jump over it. Pick up the Uzi Clips from the alcove on the right and slide back down (see this screenshot if you do not know where to jump). [Note - Alternatively, after dropping from the zip line on the other side of the river, do not climb on the block. Instead turn to the left and proceed a few steps on the left of the block. When you reach the bank, turn left towards the river. You can see a shallow underwater platform going along the bank. Take a running jump to land there with a splash (the piranhas will not approach you). Run forward and then turn right to enter the forest. Now you can go for all the pick-ups in the areas around at your ease, since the tiger will not be triggered.] Follow the path between the trees to find a Small Medi Pack on a low stone block. If you are quick, you can get it now, otherwise one of the two monkeys will get it. You can kill the monkey and get the Medi Pack now or follow the monkey to see where it drops it or get the Medi Pack later. Go to the left of the path between the trees. Up to the right you can see a boulder. You do not need to worry about it now. Go to the left and throw the switch inside the opening to open a gate next to the boulder. Now you need to worry about that boulder. Immediately side-jump twice to the left to avoid it, as it is rolling towards you. At the far left corner of the area, you can find some Flares (and the Small Medi Pack if the monkey got it before). Return through the opening with the switch, jumping over the boulder. Continue ahead, where the boulder was. Go through the gate on the left hand side and throw the switch to open the second gate outside to the left. Before going through it, draw your weapons and wait for a tiger to show itself from the leaves on the far right. Kill it from here where it cannot reach you. Now follow the path almost at the end and go up the slope and through the leaves the tiger came from. There is a wooden ledge on the left hand side. Take a standing jump over its sloped part and pick up the Shotgun Shells. Return to the path and draw your weapons because when you are ready to reach the opening at the end, a second tiger attacks. Take care of it. Misty area\ area with fallen tree - Go through the opening and follow the path on the right hand side. Climb onto the block and continue exactly ahead to reach the far right corner of the area. Pick up the Shotgun Shells in front of the tree trunk and the Uzi Clips from the left. Slide down and for now avoid the hole in the middle of the area. Continue ahead and crawl beneath the tree, where the monkey is. Stand up and go to the right to reach the bottom of the fallen tree. Get the Crystal and kill the tiger that is coming from the top of the tree. Walk up the tree and halfway notice the branch on the left. Jump onto it and head forward, towards the tree trunk. At the end take a standing jump to the next branch on the left. Pick up the MP5 Clips and return to the fallen tree. Follow it to the end and go through the vine covered opening. Slide to the either left or right hand side of the tree trunk, but do not go through the opening that the friendly monkey shows you. 4th Secret - Facing the tree trunk you just slid, walk up to the edge of the opening in the floor. Take a standing jump to grab the edge of the well hidden crawlspace on the tree trunk. Pull up and crawl inside. Get the Flares and the MP5 Clips at the end and crawl back. Before dropping down, position Lara to the very right or left hand side of the crawlspace and hang from the edge (or hang and shimmy to the very left or right). There is a slide below you. Assuming you are hanging from the right hand edge, let go of Action to drop onto the slide. Press Jump to back-flip on another slide behind you. Keep pressing the Jump button and press the right direction key at the same time to land outside the spiked trap. If you drop into the spikes, you will lose some health. Carefully Walk to the left or right hand corner and take a standing jump outside the spiked trap. Get the two sets of Desert Eagle Clips from the two corners ahead. To clear the angled ledge on the left hand side, stand one block away and take a standing jump. Drop through the hole in the floor next to the spiked trap. Press the Walk button to safely pass through the spikes and climb out at the end (Lara will get a little damage). You are back to the misty area, so head to the left and once again crawl beneath the tree. Continue to the right and up the fallen tree. Go through the vine covered opening and slide to the left or right hand side of the tree. Go through the opening on the left and follow the grated tunnel to the end. Walk through the spikes and go to the end of the ledge. Stand at the edge of the green ledge and take a standing jump to grab the rocky block ahead. Pull up and pick up the Small Medi Pack. Turn right, walk to the edge of the block and take a running jump to grab the opposite ledge (the entrance of the grated tunnel). Pull up and side-step to the back left corner. Take a standing jump to land on the corner of the triangular ledge (see this screenshot). Then go around to the right to get the Crystal at the end. Return back to the triangular ledge and stand on the front right corner. Press forward to slide onto the ledge below. Take a running jump to grab the rocky block where you got the Medi Pack and pull up. (Alternatively, as soon as you step onto the spiked path after the grated tunnel, do not go any further. Instead, turn around to face the exit of the grated tunnel. Stand against the small step and jump up to grab the ledge above the exit. Pull up and climb on the ledge to get the Crystal. Then turn left and walk on the same ledge until the end. There turn left and slide down to the rocky block. Take a running jump to grab the ledge at the opposite side, where the Medi Pack is.) Stand against the wall ahead and jump up to grab the crevice. Shimmy to the left until you can pull yourself onto the ledge where a monkey is. Turn right and climb on the block. Drop down on the other side and follow the dark passage on the right where another friendly monkey is. 5th Secret - Before using the switch, notice the crawlspace at the top of the left hand wall. Climb through it, get the Harpoons and the Rocket and climb back out. Throw the switch to open the gates to the area below. The boulder above starts rolling when you reach the dark part of the passage. So, you may need to light Flare in order to see clearly. There is no reason to sprint or whatever. Just run normally, sticking to the right hand wall. Go through the opening you came from. As soon as you exit, turn around and drop backwards to grab the edge of the ledge. Shimmy to the right if necessary and drop onto the rocky block (where you got the Medi Pack before). Turn left and take a standing jump to the greenish ledge below. Hang from the edge and drop down. Kill the tiger that is lurking at the bottom and then drop down. Dark jungle part - Go down the steps and through the gates you just opened. Look for a ledge in a tree trunk on the left, where you can climb on and find some Flares. Get them and drop down again. Follow the path as it turns left and go between the two big trees (you may need to take a standing jump to clear the angled ledge between them). Depending on the time it took you to get here, you may not have seen a monkey that grabbed a Small Medi Pack and disappeared through the greenery on the left hand side. If you saw it, do NOT rush to follow the monkey and do NOT kill it yet. Continue cautiously to the lighted area. Make slow steps to trigger a boulder that rolls from the greenery. Continue ahead further to trigger a second boulder (see this screenshot). If you killed the monkey, the first boulder has covered the Medi Pack and you cannot get it. Once both of the boulders have rolled, approach the greenery. Take a standing jump to the right or left hand side of the greenery to clear the slope, but do NOT jump in the middle because a third boulder rolls from there. Pass through the plants to reach a small area with a hole on the left. If you did not kill the monkey before, you will find the Medi Pack in front of the hole. 6th Secret - Turn around to face the way you came and drop backwards to grab the edge of the hole. Do not let go of Action, as there are spikes at the bottom. Release Action and press it again to grab the edge of the cave below. Pull up and pick up the Flares from the left and the Crystal from the right. Return to the edge of the cave and take a standing jump to the block ahead, pressing Action to avoid hitting on the upper ledge. Turn around to face the cave and take a standing jump to grab the edge of the hole. Pull up and continue ahead sliding into the jungle again. Head to the left to reach the shore of the stream. The water is shallow and Lara can walk inside. Go to the right hand side and pick up the Uzi Clips from the greenish ledge. Return back to the shore of the stream. There are two ways to complete the next part. The one is by following an underwater tunnel and the second by going through a cave. Regardless of the way you choose, you can have all the kills and pick-ups if you follow this walkthrough. Make your decision and then follow the Common Route below. First way\ through the underwater tunnel - From the shore of the stream, drop into the water and swim beneath the log, heading to the far right corner. Swim through the tunnel and then through the gate that closes behind you. Climb on the walkway and throw the two switches (one on each side). The left one opens a gate in a room you have not been in yet (the next room) and the right one opens the two gates in order to exit this room (the one you are currently in). Drop into the water and swim through either of the gates to reach a big pool room with a central platform. Climb onto the central platform and pick up the Flares. Assuming you have the two gates from where you came to the back of you, you can see the gate you just opened exactly ahead and another opening with two lit torches on the left. If you want all the kills, you must go through the opening with the two lit torches NOW and then come back. Otherwise, skip the next paragraph. All the kills - Go through the opening with the two lit torches and follow the tunnel to reach an outside area. Two tigers are triggered by passing over a specific area, but you can kill them from safety if you stand at the top of the pillars. From the edge of the tunnel, hop onto the ledge on the left and take a running jump to the next ledge with the small waterfall. Turn right and take a running jump to grab the pillar ahead (you can also climb onto this pillar from the ground). Pull up, turn left and take a running jump to the next pillar. Jump to the ledge on the right hand side to pass over the area that triggers the two tigers (see this screenshot). Kill them from here. The tigers may leave, making it impossible to aim at them. In that case hang from the edge towards the tigers to attract their attention. Also, you can get the Crystal now. Make your way back to the tunnel the same way you came to return to the pool room with the central platform. Go through the gate you opened by throwing the switch in the previous room. Follow the tunnel to the end and use the switch to flood the area outside (you have already been there once if you followed the previous paragraph in order to kill the two tigers). Exit to the pool room with the central platform and go through the opening with the two lit torches. Follow the tunnel and drop into the water. If you did not get the Crystal before, swim forwards to the other side and a bit to the right to reach some steps that take you out of the water. Climb onto the angled block that is behind the grates, turn right and take a running jump to the next angled block. Continue forward to get the Crystal. Drop into the water again and locate the ledge you can climb out in front of the grates (it looks like a small waterfall). Follow the Common Route below. Second way\ through the cave - From the shore of the stream, continue to the left and take a running jump to land on the log in the middle of the water. Step on the higher ledge of the log and turn to face the shore of the stream you came from. Walk to the edge and take some steps to the right to reach the highest part of the ledge. Jump up to grab the branch above and pull up. The camera changes view here, but you can press the Look button and break it. Throw the switch at the end of the ledge to open a gate on the other side of the stream (the camera helps you locate it). Safely drop onto the log below. Turn having the shore you came from to your back. The gate you just opened is at the far right corner (look at the top). Take a running jump to grab the rock ledge ahead and pull up. Continue to the right, climb through the opening and then through the gate you just opened. Follow the passage and jump to the branch ahead. You are now above the first river with the strong current, almost at the beginning of the level. Follow the branch around to the right and then left to reach the zip line. Stand if front of it and press Action to grab the handle. Keep pressing Action until you reach the other side. Once you drop down, follow the passage to reach the next area. Go down the steps and halfway climb onto the angled block on the left hand side. Turn right and take a running jump to the second angled block ahead. Continue forwards and get the Crystal. Two tigers are triggered by passing over a specific area, but you can kill them from safety if you stand at the top of the pillars. Walk to the edge opposite the Crystal and take a standing jump to the platform below. Turn right and jump to the pillar to pass over the area that triggers the two tigers. Kill them from here. The tigers may leave, making it impossible to aim at them. In that case hang from the edge towards the tigers to attract their attention. Take a running jump to the column of the left and turn right. Take a running jump to grab the rock ledge where the small waterfall is. Pull up and take a running jump to the ledge on the left. From here take a diagonal standing jump into the tunnel. Follow it to the end to reach a pool room with a central platform, passing through an opening with two lit torches. Drop into the water and climb on the central platform to get the Flares. Assuming the opening you entered is to your back, you can see a closed gate on the left and another one ahead. Drop into the water and climb on the ledge that is in front of the second gate ahead. Go to the right where you will find a movable block at the end. Pull it twice to open the nearby gate and reveal an alcove with a closed trapdoor behind the block. Go through the gate you just opened and throw the switch to open the trapdoor behind the movable block. So, make your way back to the block, climb on it and drop down to the other side. Drop into the water to reach a small room with a walkway in the middle. Climb on the walkway and throw the two switches (one on each side). The one opens the other gate back to the pool room with the central platform and the other one opens the two gates in order to exit this room (the one you are currently in), although you can leave the same way you came through the trapdoor. Return to the previous pool room with the central platform and go through the gate you just opened (the left one assuming you have the opening with the two lit torches to your back). Follow the passage and use the switch to flood the outside area. Exit to the pool room with the central platform and go through the opening with the two lit torches. Follow the tunnel to emerge outside and drop into the water. Swim to the far left corner and locate the ledge you can climb out in front of the grates (it looks like a small waterfall). Common Route - Once you climb onto the ledge, go through the passage and climb up the ladder. When you exit the passage, go to the right. Halfway jump up to grab the ledge above and pull up (or proceed ahead, climb onto the block, turn around and take a running jump to the ledge). Enter the alcove and throw the switch to open a gate into the water below. Exit the cave and drop into the water. Swim through the two columns to reach the gate you just opened. Follow the tunnel until you can surface. A tiger is waiting for you outside. Climb out of the water and take care of it. Pick up the Shotgun Shells and the MP5 Clips from the two dark alcoves and climb up the ladder. As soon as you reach the top, pick up the Indra Key. If you do not take it on time, the monkey will grab the Key and you need to kill it in order to get the Key. Go to the other side of the roof to reach a greenish ledge above the swamp you saw at the beginning of the level. You may want to kill the tiger that is lurking on the steps below from here. Once you are done, drop onto the steps and go down to the end. Jump to the ledge beyond and use the Indra Key to open the gate. Before going through it, jump to the ledge on the left and take a standing jump over the slope to get the Shotgun Shells. Drop into the swamp and go through the gate to end the level.
|
||
| Index | Temple Ruins » | |
|
Copyright © www.tombraiderchronicles.com |
||