Tomb
Raider The Lost Artifact Walkthrough and Game Guide
Featuring All Secrets and Hidden Rewards and packed with Screenshots
Level 4: Sleeping with the Fishes
|
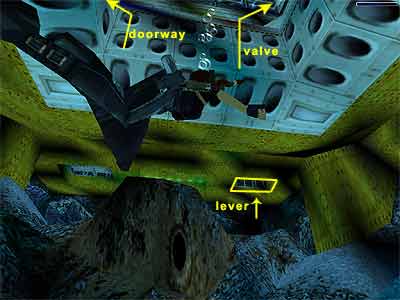
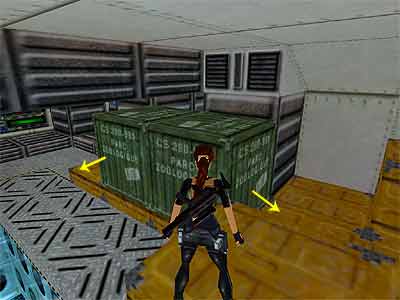
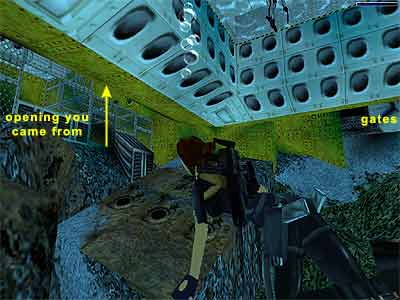
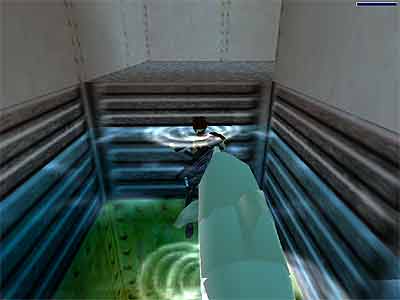
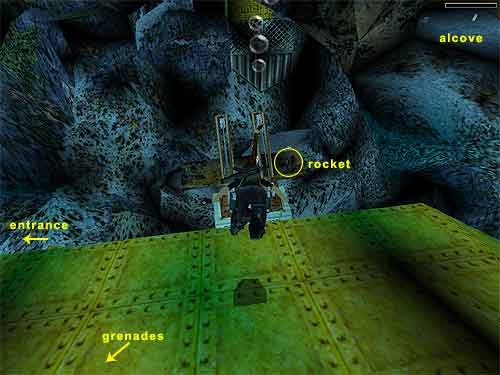
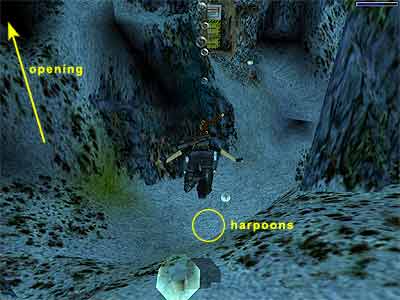
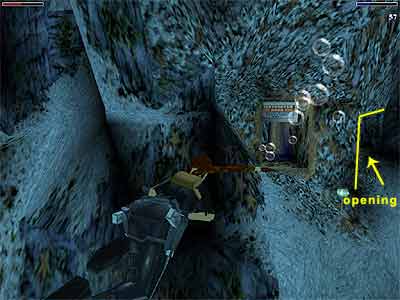
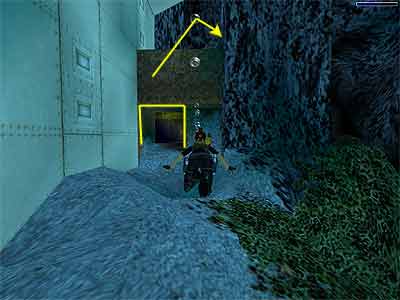
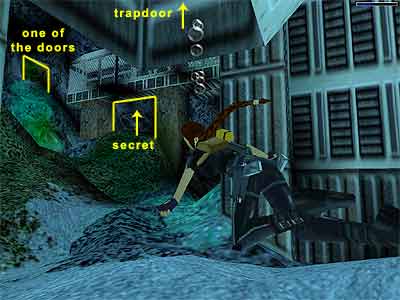
Pick up the Harpoons from the alcove and continue to the next room. Drop into the pit on the right hand side and get the Flares. When you do that, the camera shows Lara from inside the next room, making a note of the scuba diver and the pick-ups. Climb out of the pit and go through the next opening. To the left is a closed door marked with the sign "Restricted Area" that you will open in a while. Continue to the right to reach a window that looks over the sea. Go through the opening on the left to reach a room with a pool. A guard will run from the ledge above, so shoot him. If you do not manage to kill him, he will run to the left. Go around the pool and use the valve to open the "Restricted Area" door. And if you did not kill the guard before, he will exit through that door, so stay sharp. It is a lot easier to kill him if you stay close to the valve. Stay there waiting for him and as soon as he arrives, start shooting. You will be able to kill him before he even reaches you. For some reason, he will not approach the side where Lara is standing (close to the valve) and hopefully without health loss at all. First underwater area – Before proceeding to the door you just opened, drop into the pool. Facing the doorway you came from, swim down and forwards where you will find some Harpoons on a ledge. Return back to get some air and surface with the doorway you came from to your back. Swim down and to the far left corner and through the opening (as shown here). Pull the underwater lever to open the gates on the right and alert the scuba diver. Harpoon him or (if you do not have the Harpoon Gun), swim to the next room, climb out of the water and kill him from above. Pick up the Harpoons and the three sets of Shotgun Shells (or the Shotgun instead of one of the sets if you do not have it). Swim back and climb out of the water and into the room you came from. Make your way back and go through the "Restricted Area" door. Pick up the Small Medi Pack on the left and continue through the hallway. Pick up the MP5 Clips at the end, back track a bit and go through the opening on the left (or to the right as you return back). Second underwater area – Slide down the ramp to drop into the pool. Pull the underwater lever on the left to open the gate and alert the two scuba divers from the next sub outside. You can either Harpoon them or quickly swim beneath the sub where you can climb out and kill the baddies from there. Inside the sub you will find some Flares and Harpoons. Push the button close to where you found the Flares to open a gate back in the water. Before leaving, locate the two movable green crates. Go behind the yellow boxes and pull the first crate. Then push the second one to reveal a passage (as shown here). At the end, you will find a Small Medi Pack. Jump into the water and swim towards the opening you came from (do not get confused with the double gates you opened by using the button. See this screenshot to get oriented). Do not go through it. Instead swim upwards and turn around. Get the Uzi Clips from the ledge and swim through the opening on the right. Get the two trines of Harpoons in the passage and enter the next underwater area. A pair of sweet dolphins swim around here and the current will start dragging you on the left, taking you next to another opening. Swim through the tunnel. 1st Secret – On the T-junction, go to the left. Climb out of the water and pick up the two Large Medi Packs and the Harpoons (or the Harpoon Gun if you do not have it). (Note - The dolphins are so friendly and if you stand in front of the ledge you are about to climb out, one of them will come and push Lara on, as shown in this screenshot. Awww...) Jump into the water and follow the other side of the T. Climb out of the water and kill the guard that is lurking here. Pick up his MP5 Clips (or the MP5 Gun if you do not have it) and drop into the water on the left. Get some Harpoons and a Small Medi Pack and swim through the opening on the other side to return back to the sub. Third underwater area\ big sub – Swim through the gates you opened by using the button. The current will drag you into the next area and the gates will close behind you. Swim beneath the yellow sub and surface to get some air. Do not climb into the sub. This will trigger the appearance of two scuba divers, making the next part more difficult to complete. Instead, dive into the water again and head to the left where you will find a Rocket on a rusty hanging ledge. If you need some air, go back to surface and again do not climb into the sub. Above the rusty ledge, search for an alcove that contains some Flares and a Circuit Bulb (Yellow). Now swim to the top of the sub where you will find some Grenades and return inside the sub to get some air (the Rocket, the alcove and the Grenades are shown in this screenshot). Dive back down and having the tunnel you came to your back, swim to the left, passing the rusty hanging ledge from below. Swim between the rocks where the lamp is and look for another lamp at the bottom. Close to it you will find some Harpoons. Make sure you do not move beyond the lamp or you will trigger two more scuba divers. Search above for an opening in the ceiling (as shown here). Surface there and climb out of the water. Pick up the Small Medi Pack and another Circuit Bulb (Blue). Inside the sub - Swim back into the sub and climb out. Pick up the two trines of Harpoons and the Large Medi Pack and place the two Bulbs into the receptacles to open the yellow door back in the water. The first two divers are in the water. You can either deal with them or complete the next part quickly and avoid them. 2nd Secret – Drop into the water with the two receptacles on your left. Swim passing beneath the rusty ledge. Pass the first lamp, heading to the yellow door you just opened. As you move to the right, the second pair of divers attack. Deal with them or ignore them. Swim towards the door, but do not enter. Instead, swim through the opening on the right (as shown here). Follow the tunnel to reach a cave. Ignore the pick-ups you see here and swim forwards and through the opening at the bottom. Follow the tunnel and climb out of the water. Pick up the Small Medi Pack and the two trines of Harpoons. Drop into the water and return to the cave. Get the Flares and be careful whilst getting the Shotgun Shells. Once you do that, the small sub from beyond will come down and hit you, unless you make it on time. The sub will crash the wall, revealing a wreck. Swim through that opening and if you need some air, search for the opening above to the left. Then swim to the top of the sunken ship where you will find the Desert Eagle Gun (loaded with three rounds) and two sets of Clips for it. Swim back to the cave and through the tunnel you came from. Make a U turn to the right and go through the yellow door you opened before. The current will drag you almost at the end of the tunnel. Hallway and Control Room - Climb out of the water and into the hallway above. There is a closed gate at the end and a yellow door almost halfway on the left. Draw weapons and shoot in the air to alert the guard inside the control room, who will come to see what is going on and open the door. Kill our curious buddy and enter. Pick up the Small Medi Pack and the Flares in front of the window and the Harpoons behind the radar. Be careful of the trapdoor at the middle of the room. If you fall through it, search for a yellow opening exactly opposite the grated passage. Swim through it and then swim to the left. Push the button to the right side of the door (as you face it) to open the gate outside. Exit and go to the left through the gate you just opened. Here you will find two valves that open the two doors in the water, releasing two mutant fishes. Continue to the end of the hallway and pick up the Small Medi Pack and the Rocket (or the Rocket Launcher if you do not have it). Then return back to the control room and fall through the trapdoor. You can either harpoon the fishes or lure them outside of this area. Then climb into the hallway and kill them from above. If you are lucky one of them may swim through the tunnel and enter the area where the scuba divers were. Having the two doors you opened on your right, swim above the rusty opening and get the Harpoons from the lower ledge on the right (see this screenshot to get oriented). 3rd Secret – Swim to the underwater area and go beneath the grated hallway (as shown here). To the left is an underwater tunnel. Swim through it, but stop halfway through because another mutant fish will attack. Harpoon it or, as before, lure it outside and kill from above the hallway. Then return back and claim the prize – the Large Medi Pack, the Grenades and the Grenade Launcher. Return back to the underwater area and surface where the trapdoor is. Research Lab – Swim through the hand right door you opened by using the previous valves and get the Mutant Sample (Aqua), then swim through the left one and get another Mutant Sample (Pink). Continue through the tunnel and climb out of the water to reach a research lab. (Note about the two mutant fish that are released when you open the underwater doors - Once you enter the left-hand door, heading to the Research Lab, they are really slow in following you that far in the tunnel. So you can swim quickly past them, grab the two Samples and swim to the Lab. Pull up to the platform. Now you can wait for the fish to arrive and kill them from there, or just forget about them, if you are not interested in getting all kills.) Go down the ramp to the room that contains cages with mutants. Move away the movable crate at the far side to get some Uzi Clips beneath. Then pull the movable crate to the left of the entrance (as you face it) to reveal a computer behind. Place one of the Samples here and the other to the other computer on the right. This fills a pit with water in a room you have not been in yet. Exit and go up the ramp, then up the steps. Kill the guard in the next room and pick up his Small Medi Pack. Go around the flooded pit and jump up to grab the upper ledge. Pick up the Rocket and pull onto the upper single ledge to get the Grenades. Drop into the water and get the Hand of Rathmore. On getting the artifact, the door beyond opens. Swim through it (say "hello" to our sweet dolphin) and pull the underwater lever on the left to open the next door. This releases a mutant fish that you can either harpoon or kill it after climbing out of the water in the previous room. Inside the fish tank and to the right, you will find some Uzi Clips. Get them and swim through the opening in the ceiling. Climb out of the water and step off the ledge to end the level.
|
||
| « Level 3: Shakespeare Cliff | Index | Level 5: It's a Madhouse! » |
|
Copyright © www.tombraiderchronicles.com |
||