You begin the level inside a closed cage, which is surrounded by rocks and three sasquatches (another version of the original TR2 tibetan yetis). Turn around and pull the movable cage in front of the door. Pick up the Flares and push the cage on the gold tile. This opens the trapdoor in the middle of the room. Use the switch on the side of the block to open the door, hop back and jump on the block. The sasquatches will come inside, so equip a powerful weapon and kill them as they enter, because they can climb on the block if they want to.
Exit the cage through the door and pick up the Uzi Clips. Vault onto the low rock ahead and go to the left. Pick up the Flares and the Small Medi Pack. There is a cave with three entrances on the other side of the area. As you approach, another sasquatch will come, so kill it. Enter the cave through the right hand opening. At the far right you will find some Shotgun Shells. Continue to the left and into the middle part of the cave. Pick up some more Shotgun Shells and jump over the spiked pit to reach the third part of the cave. Here you will find a Large Medi Pack in front of some bars. On getting it, the camera shows that a sasquatch has magically appeared on the block inside the cage. Of course it will come out, so stay at the entrance and kill it as it approaches. Then make your way back into the cage.
Underground cave - Climb down the ladder of the trapdoor and drop to the gold block. Then drop to the rocks below and go to the right to enter a gold cave. Jump on the gold ledge and drop into the water through either opening. There is a low ledge with a curved face on the right, where you can climb out. Do that and climb into the right hand opening. Inside the passage you will find some Uzi Clips, M16 Clips and a Small Medi Pack.
Turn around, but instead of going back to the pool, climb into the opening on the right. Follow the cave and it will get you back to the area you came from. Jump on the square ledge (which is an extrusion of a longer one) of the gold pool and take a running jump to the alcove with the Shotgun Shells. Run-jump back to the square ledge and proceed ahead. Here you can see the back-side of a slope. Walk up to right hand edge of the ledge and jump on the slope. Keep pressing the Jump button and you will land on the safe ledge in front of the opening. Go through it and up the ramp. Grab the rocks on the left, shimmy left if necessary and pull up. Go to the left and behind the red structure. Stay sharp because a sasquatch will attack. Kill it and pick up the Shotgun Shells. Then back-track a bit and slide down the rocks. Drop through the opening and into a cage.
Connected cages with gates and switches - There are eight cages here and most of them are connected to each other. The gates open with the various switches around the place, but some switches close some gates that have already opened. The following procedure is shown in the diagram below. Note that there are two leopards around, so stay sharp as you open\ close the gates.
 |
You begin in a cage with two closed gates. Use switch #1 to open gateA. Go through it. (Note: the camera also showed you gateB opening.) Use switch #2 to open gateC and close gateA. Go through the gate you just opened. Use switch #3 to open gatesD and E and close gateB. Go through gateD and pick up the Shotgun Shells. Use switch #4 to open the exit door (F).
Go back and through the last two gates D and C. Continue through gateE and use switch #5 to open gateA, G and H. Go back to the cage you started and use switch #1 again to open gateB and close gateA. Exit through gateH, go through gates D, C and E and now go through gateB. Use switch #6 to open gateI and close gateG. To re-open gateG, use switch #5 again. Go through gateI and jump into the small pool to get some Automatic Pistol Clips. Pick up the Small Medi Pack from the last cage and go through the exit.
Past the cages - On the T-junction, go left. Slide down the slope and jump to grab the ladder. Climb almost to the bottom and release to drop next to the spikes. Walk through them and pick up the Uzi Clips. Grab the ladder again and climb to the top, then to the left. Drop next to the spikes, turn around and again walk through them. Jump to the opening and enter the dark room on the right. Here you will find some Flares and Automatic Pistol Clips. Find the rocky steps and go up them. Follow the passage and on the T-junction, go right. Take a diagonal standing jump on the right hand block and pick up the Automatic Pistol Clips.
1st Secret - Go back to the other side of the T and pick up the Gold Coins from the alcove. On doing that, the trapdoor opens. The area below is the one with the connected cages, where a sasquatch is waiting. You may not be able to target it from above, so equip a powerful weapon, drop down and kill it. Then make your way to the exit door, as you did before.
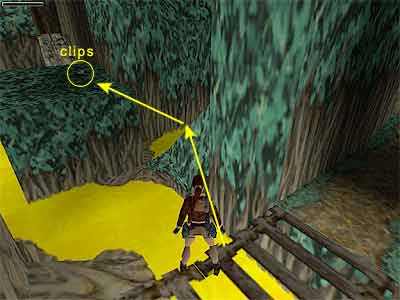
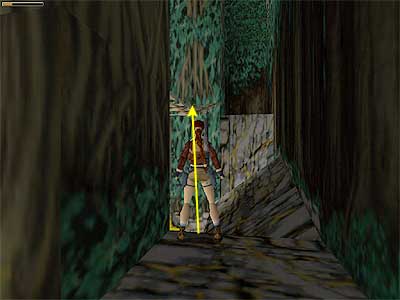
Area with trees - This time go to the right of the T and up the ramp. Climb up the two stone blocks and into the doorway. When you pick up the Large Medi Pack, two sasquatches attack from ahead. Take them out and drop to the ledge on the right. Proceed ahead and jump on the flat ledge between the two trees. Another sasquatch (who does not get hurt by the gold liquid) comes from the left, so kill him as he approaches. Cross the bridge, but stop halfway. Take a look on the left and you will see two sets of Automatic Pistol Clips on the greenish ledge. To grab that ledge, take a running jump, jumping from the higher point of the bridge (as shown here). If you cannot do that, stand in the middle of the bridge, turn 45 degrees to the right, take a standing jump to the top of the slide and keep pressing the Jump button along with the left direction key in order to land on the ledge (see this screenshot to get oriented).
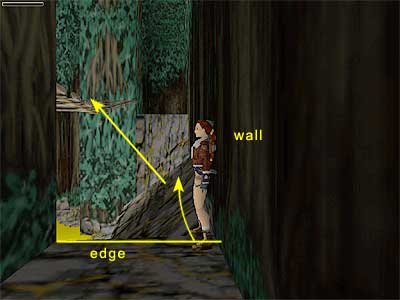
2nd Secret - With the bridge you came from to your back, proceed ahead and take a running jump to the rocky slope. Press Action to grab the edge and shimmy to the left. When Lara stops, pull up and go to the left. You need to jump to the bridge on the left, so walk up to the edge of the ledge and stand in the middle. Turn left and take a standing jump pressing left in midair to help Lara's job (see this screenshot for the correct starting position). If you cannot do that, turn your back to the wall and side-step to the right to reach the edge. Side-flip on the rocks and keep pressing the Jump button to land on the bridge (see here for the correct standing position). Depending on the spot you land on the rocks, you may have to press Action, grab the bridge and pull up. Then jump to the ledge with the Gold Bars.
Slide down the ramp to land on a safe ledge next to the gold liquid. Jump to the tree roots with the M16 Clips. Proceed to the higher part on the roots, turn to face the entrance and take a running jump to the opposite side, without pressing Action or Lara will not make it. Again, jump to the flat ledge between the trees and cross the bridge to the end. Turn left and notice the warrior that patrolls on a ledge. Take a running jump to grab the orange pillar with the greenery on the left and pull up. Go around to the right and pick up the Small Medi Pack. Now you can decide if you want to kill the warrior or not. If you kill him, you can pick up two sets of Grenades from his body. Then jump back to the ledge you came from and enter the building on the left.
Area with + (plus) shaped gold pathway - When you enter, go to the right. On the T-junction follow the left hand way and pick up the Grenades. Back-track to the entrance and use the switch to open a trapdoor in the room with the + shaped walkway. This also drops a thug. Continue through the hallway until you see a pair of switches on the left hand wall. First use the left one to open three doors in the room and release three warriors. Then use the right hand switch to open the door that leads inside the room. If the warriors fail, finish the thug.
Pick up the Large Medi Pack beneath the cage. The door you hear opening is the one of the cage above. For your information, a second door opened outside at the end of the hallway, releasing a sasquatch that will soon come in the room. So, stay away from the entrance and start shooting as it enters. If the warriors are still alive, they will pretend they never saw the sasquatch, so you have to deal with it by yourself. Once you are done, climb to the doorway you came from and kill the thug from the cage.
Continue to the end of the hallway, picking up the Automatic Pistols Clips on your way. Go through the gold door and proceed to the end of the room past the ramp. Pick up the Uzi Clips and back track to slide down the short ramp. Do not rush! If you take a look below, you will see that this is a long drop down.
Treetops - The growling you hear comes from two sasquatches at the top. Do not hesitate to draw weapons and shoot them when Lara aims at them. This will make your later job easier. Jump to the branch ahead and move to the right where its part is higher. Jump to the branch with the Flares and pick them up. Turn around and move to the right, where the part is higher. Jump to the branch you came from, then take a standing jump to grab the wooden bridge. Pull up and go to the right. Turn right and jump to grab the ladder on the side of the tree. First go down. When you reach the bottom, back-flip to the greenery behind. Then jump to the part of the gold liquid where the two sets of Grenades are. It is the only safe part. Jump back to the greenery, grab the ladder and climb to the top.
As soon as you reach the top, open fire for the two sasquatches. It is obvious that a poor man tried to do it but failed. Pick up the Small Medi Pack and go to the other side of the area. Oops! Another poor guy that failed, but good for you because he left his Automatic Pistol Clips. Jump over the gap and pick the M16 Clips. Then climb down the ladder close to the skeleton for another Small Medi Pack. Turn to face the ladder, but do not stick to it. Take a couple of steps backwards and side-step to the right to reach the edge. Side-flip to the left to land onto the gold slope. Allow Lara land on the next greenish slope and quickly press Jump to jump to the opposite gold slope. Allow Lara slide to the end, where you will find some Shotgun Shells.
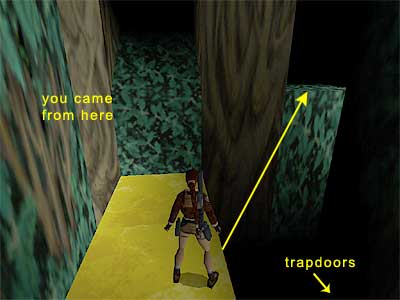
Area with gold walkway and trapdoors - With the slide to your back, take a running jump to the gold ledge beyond. As you can see, this is a twisted walkway with various trapdoors. There are also three sasquatches in the dark area. Two of them will come out as you cross the walkway. You need to kill them, whilst being careful not to fall into the pits with the gold liquid. Instead of doing that, you can also try this: once you land on the walkway, notice the greenish ledge on the left hand wall (see this screenshot to get oriented). Take a running jump to land on it and draw weapons. The first sasquatch will attack, so start shooting. If you want, drop into the greenery and you will be safe from dropping into the gold liquid. Light a Flare and go around to the left, where you will find some Shotgun Shells.
Continue to the other side of this area (to the right if the gold walkway is to your back) and the second sasquatch will attack. Kill him and proceed more. The third sasquatch will come, so take care of it. Pick up the Small Medi Pack and continue more into this area. Be careful of the spiked pit! At the end, pick up the Uzi Clips and climb on the greenish ledge. Drop down and vault on the gold walkway.
3rd Secret - Go to the right, heading back to the entrance. Go to the first trapdoor, which is probably closed. To open it, jump to the walkway which is alone at the start (where you began). Then quickly drop through the trapdoor. Follow the tunnel and climb up the two blocks. Climb up the ladder and when you reach the red wall, back-flip to the ledge behind. Climb on the ledge above and drop to the gold slope ahead to slide on a flat ledge. Take a running jump to the opposite side.
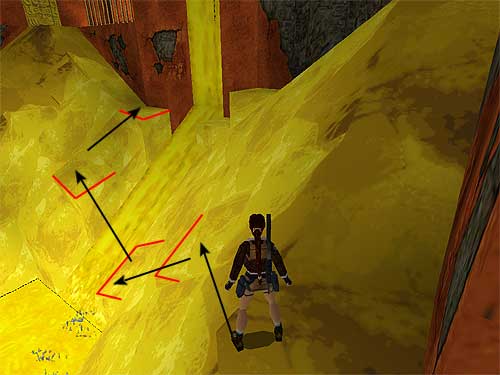
You need to reach the alcove on the exact opposite side, jumping on the flat ledges of the slides around. Take a standing jump to the flat ledge which is below on the left, then one more to the flat ledge two squares below. To avoid falling into the gold liquid, jump from the back side. Now stand on the higher part of the ledge and take a running jump over the gold fall in order to land on the opposite sloped block. Turn right, stand against the slide, side-step left to reach the higher part and take a standing jump over the slide (this screenshot shows the above procedure).
Turn left and notice the flat ledge on the slide. Take a standing jump there and finally take a running jump to the block which is next to the alcove (see this screenshot for the last couple of jumps). Jump towards the alcove and the back wall will shatter. Enter carefully. You cannot walk wherever you want. If you take a look on the ceiling, you will see some shiny gold squares that indicate the safe floor squares. Go straight ahead and pick up the Flares. Draw weapons because a leopard will attack from the alcove. You need to kill it quickly, before it pushes you into the gold liquid. Alternatively, you can run back and jump to the right hand block (opposite the one you came from) and kill the leopard at your ease. Then pick up the Small Medi Pack.
Turn having the way the leopard came from to your back. Notice the safe square on the opposite side (as the ceiling indicates). Take a running jump there and another one on the safe square to the left. Pick up the Gold Skull and jump back as you did before. Enter the cave from where the tiger came and go up the steps. Exit through the gold door, which is now open. Slide down the ramp ahead and take a running jump to the opposite block. Climb on the next block, then on the left hand ledge. Approach the rightmost alcove and slide down the ramp to reach the ledge at the bottom of the area with the trees.
Back to the area with the gold walkway and trapdoors - Again, take a running jump to the walkway. Follow it to the end, jumping over the trapdoors. Climb up the high block, then the lower one. Climb up the ladder and continue through the left hand opening. Two leopards will attack here, so quickly kill them using a powerful weapon. Althernatively, hang from the ladder you came from, allow the leopards leave for a while, then climb up again and wait for them to show up, whilst shooting at them. Go around to the left to enter the cavern and pick up the two sets of M16 Clips and the Large Medi Pack. On getting the Medi Pack, the gate in the previous area opens. This leads to the cave with the three entrances at the beginning of the level, but obviously it is not necessary to go there again, unless you did not explore this area before and want all the kills and pick-ups.
Exit the cavern and draw weapons. A third leopard will attack from behind the rocks. Shoot it, whilst jumping backwards. Continue straight ahead to the wall with the ladders. Climb to the top. Turn around and notice the gold part above. It looks like a face. Before placing the Mask of Tornarsuk to the receptacle, go straight to the wooden gates and they will open as you approach. Go to the end and climb down the ladder. Walk through the spikes and pick up the Large Medi Pack from the far right corner. Walk back and through the spikes, climb up the ladder and exit.
Dealing with the Guardian - Place the Mask to the receptacle. The gold face will turn into a ramp, which leads to a room. Soon, the Guardian will appear, who will come down the ramp. If you have played and completed the Dagger of Xian, you should recognize him as the main boss of the Tibetan levels (Ice Palace level, specifically). Step to the side and when he comes to the bottom of the ramp, run past him and go up the ramp. Jump whilst running in order to cover more distance. Inside the room you will find a Large Medi Pack, some Grenades and a switch. If you want the pick-ups, you need to take them one at a time. This means that you have to get one, exit and go down the ramp, let the Guardian come down and quickly go and get the second pick-up. You need to do that process once more in order to use the switch.
The switch opens the wooden gates below. Go through them and you will now see a walkway that leads to a switch. Quickly flip it and the Guardian hopefully will either be trapped on the other side or fall into the pit. Now start shooting at him. When he dies, the level ends.
(Note - If you have found all 12 Secrets of the game, you will have access to the bonus level: Nightmare in Vegas. The credits will roll and the game will prompt you again to the passport. Instead of loading, turn one page and you will have the option of choosing any of the four Gold levels, plus the bonus one.)
Copyright © www.tombraiderchronicles.com
No reproduction, in full or in part, without permission.